Here’s a very easy craft project to do with the kids this weekend.
Given its been kinda wet outside these past few days spring doesn’t really feel like its in the air. So, why not bring spring indoors with this cute spring bouquet made with tissue paper flowers.
These are easy to do yet an enjoyable activity for children both big and small.
Bouquets can be decorated anyway your child desires whether it be simply dotty flower wrapping or crystals and bows.
To make these with your children, here’s what you are going to need to make it happen.
3x Sheets Of Tissue Paper (3 different colours)
Mod Podge (or PVA/water mix)
Ribbon
3x Strong Glue Dots
3x Tiny Faux Pearls (for smaller flowers)
3x Big Faux Pearls (for larger flowers)
Decorations (examples… Embellishments, beads, glitter..)
1x Elastic Band
1x Sheet Of Green Tissue Paper (optional – if leaf shoots are desired)
Here’s what to do…
First take two sheets of tissue paper in 2 of your 3 colours and rip them into strips (you want around 6 strips, 3 in each of the 2 colours).
Now one at a time roll your paper strips ( ensure that 3 of the strips are rolled more tightly than the other 3). Now pinch 1/4 of the way down and twist to form a bud and stem.
Fiddle with the paper buds to form the flowers shape. At this point you can slightly open the buds and fluff them out a little on the not so tightly rolled flowers. For the 3 tighter flowers be sure to twist and pinch a little firmer to keep them closed like rose buds. Remember, for this tutorial we are making 3 rose buds and 3 open roses.
Now, cut of some of the stems away to make the flower smaller. At this point no glue is required as the twisted paper will hold itself.
Once you have done this step for all your tissue paper strips bunch them together and secure with an elastic band.
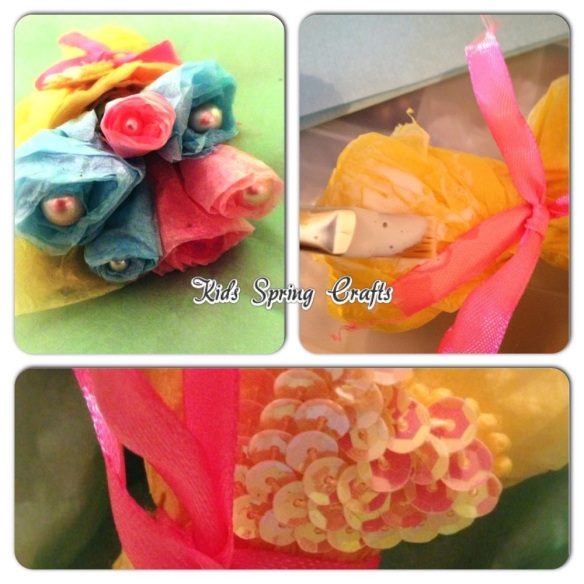
Now bring forward your remaining sheet of tissue paper, fold in half and half again and lay down at an angle like that of the image below.
Place the bunched flowers at a tilted angle so that the buds are directly beneath the top right corner like so.
Wrap your flowers in the paper forming a cone like shape, squeezing the bottom tightly and securing around the middle with pretty ribbon.
Push the 3 small faux pearls into the 3 rose buds.
For the larger open roses, add an extra strong glue dot to the bottoms of the 3 large pearls and again push into the centre of the flower.
Now add a very thin layer of Mod Podge or PVA/Water mix (though this will require many more hours to dry).
If using mod podge leave to dry for around 40 minutes (more or less dependent on the conditions your working in.) If using PVA/Water mix this could take anything from 6-24 hours to dry.
Use your decorations to glam up your bouquet. We just added a sequinned pink heart to our flowers wrapping for a pretty finishing touch. If using gems and glitter apply another coat of glue mix or mod podge to ensure all decorations are set. We just added our heart so nothing more was required.
You can let the kids go crazy making these. They could really mix up the colour combinations or even roll one colour tissue paper inside of another to give that pretty two tone effect.
Experiment with the wrapping of your flowers, maybe wrapping them in pretty cellophane or felt. Another pretty idea which can be done for winter as opposed to spring, is to add white ultra fine glitter dust around the edging of each flower for an iced, snow effect.
If like us you want some green in with your roses, then why not add some shoots of grass to your bouquet which are easy enough to achieve and requires nothing more than a sheet of green tissue paper.
Here’s how its done.
1… Simply roll the green tissue paper tightly
2… Pinch and twist a 1/4 of the way down
3… Twist tightly the remaining paper making a stem and cut in half (discard of bottom half)
4… Tie off at the end and then snip the flat end (top) to resemble grass.
5… Fit into your bouquet where desired.
Don’t they look lovely?
Hope you’re now feeling inspired and the kids are too.


Hi Claire, I just wanted to let you know I have nominated you for the LIebster Award 🙂