Cute Easter Egg Magnets

20130309-213154.jpg

These are super cute and easy to make. We made our egg shapes out of plaster and then stuck a magnet on the back of each. Its the perfect activity to do with kids both big and small.

To make these you will need some moulds, plaster, magnets, mod podge, paint and decorations.

To decorate our eggs we painted them and then used some pretty flat gems that are actually meant as nail decorations. These were actually perfect for the task at hand. Oh and let’s not forget the mod podge! All our magnets received a generous coating of mod podge gloss.

20130309-212454.jpg

So, Let your kids creative juices flow and get creative. Its a great fun activity for easter that produces sweet little keepsakes for your fridge.

These also make great gift ideas for granny or the cute alternative to chocolate making your dentist a happy bunny this Easter.

20130309-213026.jpg

Kids Crafts – Crafting With Baker Ross Ltd

20130223-054224.jpg

I love Baker Ross, they are one of my favourite online craft stores, especially when I’m purchasing craft bits for the kids.

As reviewers for Baker Ross we have been sent some fantastic craft kids for the kids to review that proved the perfect activity for a cold afternoon.

I decided to pull out the box of goodies today while the older children were at school and the toddler (Harley age 3) was in desperate need of entertaining (saving from boredom).

The first activity I want to share is that of the fabulous Bug Scratch Art Magnets.

Within the set you get an assortment of reasonably large bug shapes (12 in total), 12 scratch tools, 12 self adhesive magnet strips, instruction sheet.

20130223-054302.jpg

Firstly the scratch tools provided are wooden and are not overly sharp, so I was happy for the 3 year old to engage in this activity with my supervision.

There were all sorts of bug shapes from butterflies to spiders and Beatles. The technique is simple just scratch your shapes with your tool and the colour comes through. There are different colours on different areas of each shape meaning as you scratch an array of different colours show through, making each bug colourful and unique.

The next step is to apply the self adhesive magnetic strips to the back of your magnets and then simply stick them on the fridge or a magnetic notice board.

I love that kids can be really creative with their designs, yet there is no mess, paint brushes in need of cleaning, pen lids need finding… Nothing! Simply scratch on your designs and that’s it.

20130223-053803.jpg

The toddler had the most fun, he found the whole process fascinating. Its kinda like magic to a 3 year old.

I love his groovy bugs almost as much as I love the concentration on his cute little face.

20130223-054034.jpg

We were also sent a number of different packs of self adhesive foam shapes, flowers, dinosaurs, butterflies, and Harley’s favourite… Galaxy foam sticker shapes. This was as well as the huge tub of self adhesive foam letters.

As well as making some really funky 3D pictures and cards that I’m planning on showcasing in a later post, we also used these to decorate some foam pencil cases we were sent (these pencil cases come in a pack of 4 in an assortment of colours).

20130223-054351.jpg

A very simple craft idea, especially for a 3 year old. I peeled back the backing paper on the letters and one by one he stuck them in a row on the case in the order that they were given to him. This meant that we were left with his name across the pencil case.

20130223-054620.jpg

20130223-054454.jpg

Harley decided he wanted to use the space foam stickers to decorate his pencil case. He was able to peel away the backing paper but as this took him a while and he started to get bored of doing so I sat and removed the backing from all the shapes that he wanted. I was then able to leave him to his own devices. He had lots of fun creating a space inspired pencil case that I think looks super!

20130223-054537.jpg

Again this is the perfect activity for kids. No messy glue to contend with, just a load of paper peelings that are easily brushed into a paper waste bin in seconds.

Lastly we made the British Butterfly Decorations, another foam activity kit.

20130223-054718.jpg

These are great but a bit complicated for a 3 year old as you need to follow the visual instruction for each of your 6 butterflies. However Alice loved this one and now home from school she has taken them off with her to her bedroom to complete.

20130223-054757.jpg

When doing this with the toddler he just wanted to stick the foam pieces everywhere and anywhere. In the end I positioned each piece and he stuck it down. The next step is to thread the ribbon through the hole and then simply hang to display.

Again no glue, scissors or paints required… Another non messy activity.

Reference…

Bug Scratch Art Magnets (12 Pack)£2.99
British Butterfly Decoration Kit (6 Pack) £3.96
Foam Pencil Cases (4 Pack) £3.96
Self Adhesive Foam Letters Value Tub £6.99
Galaxy Foam Stickers £2.99 per pack

We are extremely lucky to be reviewers for Baker Ross and we love receiving a box full of materials every few months. Although we are provide with the materials free of charge for the purpose of review, all opinions are honest and that of my own.

Mothers Day Crafts – Mum Heart Magnets

20130222-205541.jpg

I love this craft idea by my 10 year old daughter..,.

Miniature mum magnets, designed to put a smile on any mummy’s face this Mother’s Day.

To make these cute set of three magnets you will need the following…

Plaster
Mini heart moulds
Assortment of acrylic paints
3 Alphabet acrylic beads in the letters (M, U, M)
Round magnets
Mod Podge

Additionally you will require some
Water (to create your plaster)
Old credit card (smooth of plaster)
Fork (to mix plaster)
Paint brushes
Additional brush for mod podge.

To make up you plaster see our last post (click Here) it simply involves just adding water.

Pour plaster into moulds & level of with an old credit card.

Leave to set, you can place in the freezer for a speedier process.

Carefully remove hearts from the silicone moulds.

Alice then used a range of different paints to decorate her 3 hearts.

Once your paint is dry cover in a coat of mod podge and secure one of each of your beads to the centre of each heart.

20130222-205139.jpg

Once dry add a second coat of mod podge.

20130222-205233.jpg

Stick your magnets to the back of each heart.

20130222-205312.jpg

Now place on the fridge.

There are many ways to give these magnets an element of surprise.

Check out what Alice did for me!

20130222-205357.jpg

Miniature String Hearts And Magnets

I love hearts and have lots of pretty hanging hearts (shabby chic style) around the home. Today I’ve decided to make my own string hearts & some mini magnets out of plaster.

Here’s what you’ll need to make these.

Bag of plaster
Small heart silicone moulds
String or twine
Assortment of paints (acrylic)
Round magnets
Mod podge
Porcelain pens (optional)

Tools…
Paint brushes
Old mixing bowl
Something to stir the plaster (I use a fork)
Scissors
Water (for plaster)

First make up your plaster with the water adding the water slowly in till the plaster forms a thick spreadable like paste, then pour it into you heart moulds.

Take your string or twine and place it so the string runs along one row of your hearts. The string should be slightly submerged in the plaster, work quickly as the plaster dries fast. Use a wet paint brush to cover the string in plaster.

20130222-225227.jpg

Take an old credit card and run it along the hearts taking off excess plaster to create a smooth finish.

20130222-230847.jpg

Leave to set… Tip: Placing in the freezer makes this a much faster process. Once set, carefully remove the hearts from the silicone moulds.

You should now be left with a string of unpainted hearts plus single hearts that will soon become magnets.

20130222-231151.jpg

Use your paint brush to paint your hearts in any designs you like. Give two coats as a base for a good strong colour. Leave the hearts to dry for around 25 minutes in between coats.

I gave mine 2 coats of ivory and then added baby pink to detail. I also used a porcelain black pen to add detail to some of my hearts.

20130222-230456.jpg

Once all the paint is dry, you will then need to give your hearts two coats of mod podge as a finish. Allow about 20-30 minutes drying time between coats.

Once fully dried you can use some mod podge to stick on the round magnets. Self adhesive magnet tape isn’t strong enough for these hearts as they are too heavy.

Hang your string of hearts from a dresser, hook or handle. Place your magnetic hearts on a magnetic notice board or maybe your fridge.

20130222-231237.jpg

20130222-234951.jpg

You can decorate your hearts any way you like. Experiment with colours, pastels or bold. I’m currently making some pastel pink hearts for my daughter. I plan to secure some miniature craft pegs to the back of each heart so that it works as a memo or somewhere to display artwork. Given shes very girly we may even add a touch of glitter.

Love to know what you think?

Decopatched Valentines Gifts Made With Mod Podge

20130206-005216.jpg

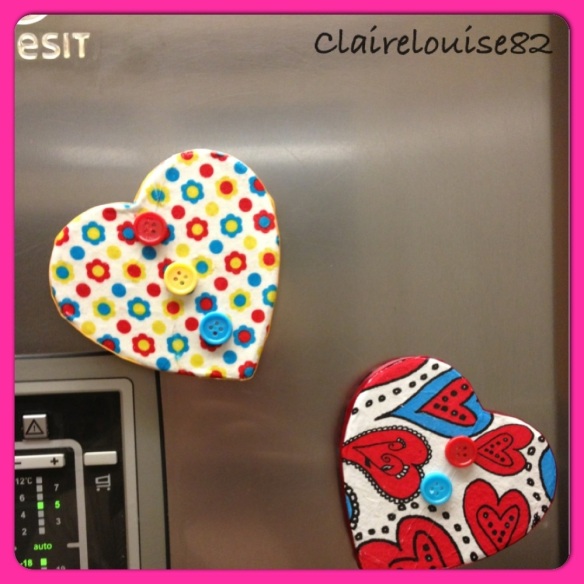
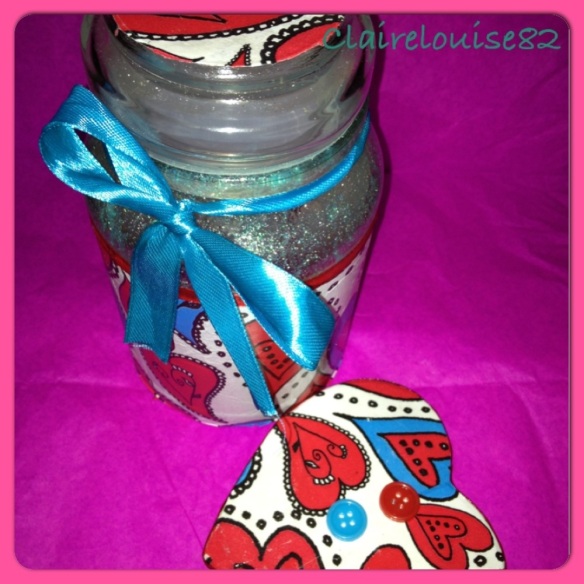
As some of you who visit the blog may have already guessed, this girl loves hearts, and what with it coming up to valentines day, its the perfect excuse to get crafty with hearts. Today I’ve decided to make some pretty sweetie jars with matching heart magnets.

The Jar is one I’ve had ready to decorate for some time. I brought a few of them on a bric a brac stall at a bootfair last year.

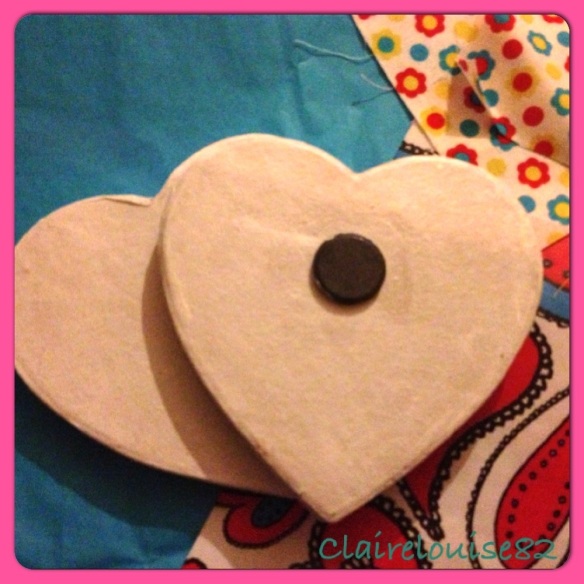
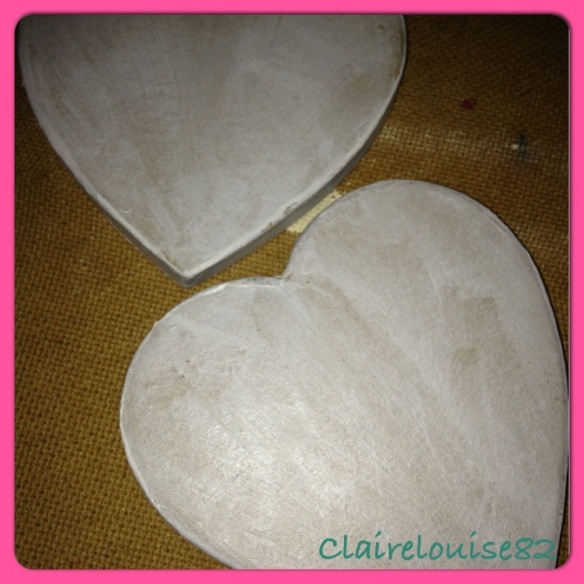
The hearts are made of paper mâché and already have the magnets attached. They are of a good size and once papered, look amazing on the fridge or a magnetic notice board. These can be brought from Hobbycraft and are available both in store and online.

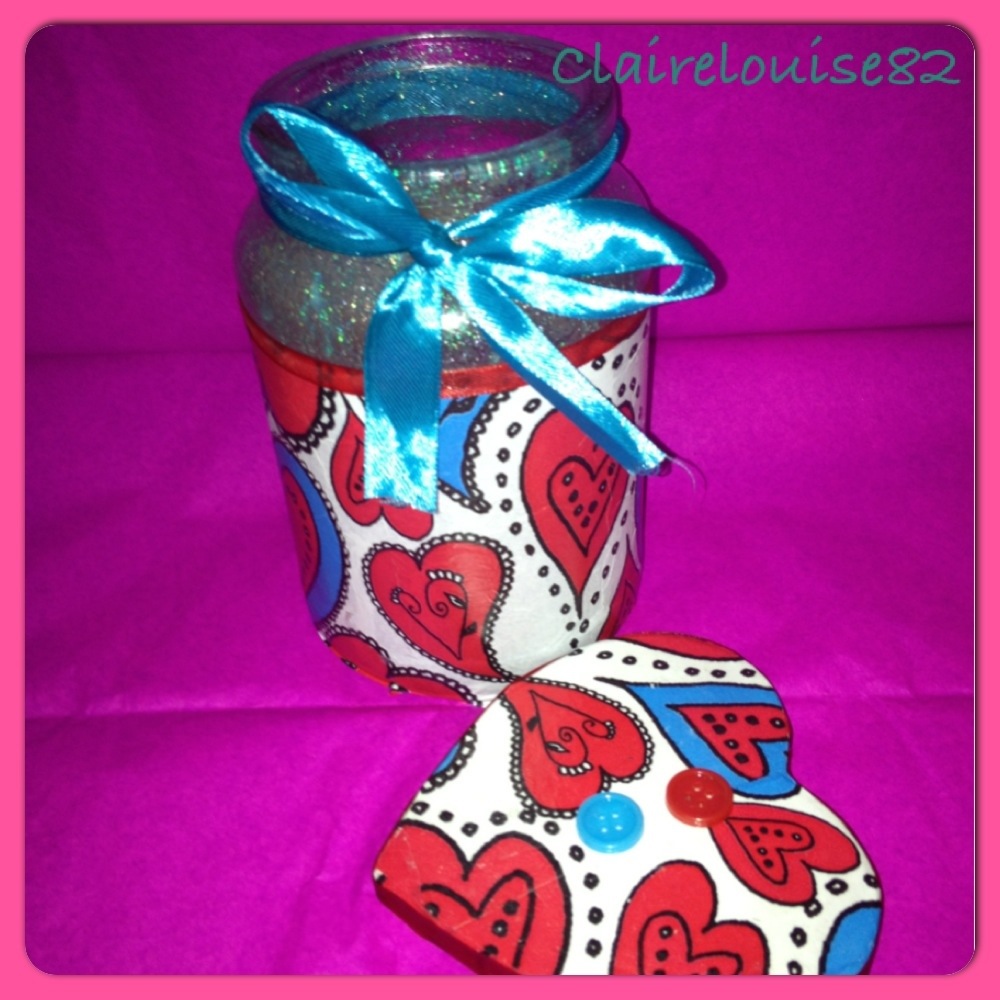
So for this project I used 2 large heart magnets and 1 jar. (Pairing a jar with a magnet to make a gift set)

Both the gift set and Individual magnet have been decorated differently but were both extremely simple to create.

20130206-005127.jpg

The first Tutorial is for my Retro Heart Magnet and Jar Gift Set.

You will need…

Medium size jar (the type with a glass stopper lid)

Large sized paper mâché heart magnet (Hobbycraft)

Funky heart Decopatch paper (Hobbycraft)

Ultra fine baby blue glitter

Mod podge (Gloss)

Thick – Satin blue ribbon (Baker Ross)

Bright red ribbon (Thin)

Dark red ribbon (medium thickness)

1 Red & 1 blue self adhesive button (baker Ross)

White acrylic Paint

Sweets or other items to fill jar

Tools…

Craft Knife
Scissors
3 Paint brushes (painting, mod podge, glitter)
Small sponge (to wipe excess mod podge)
Ruler
Pencil

First the heart magnet….

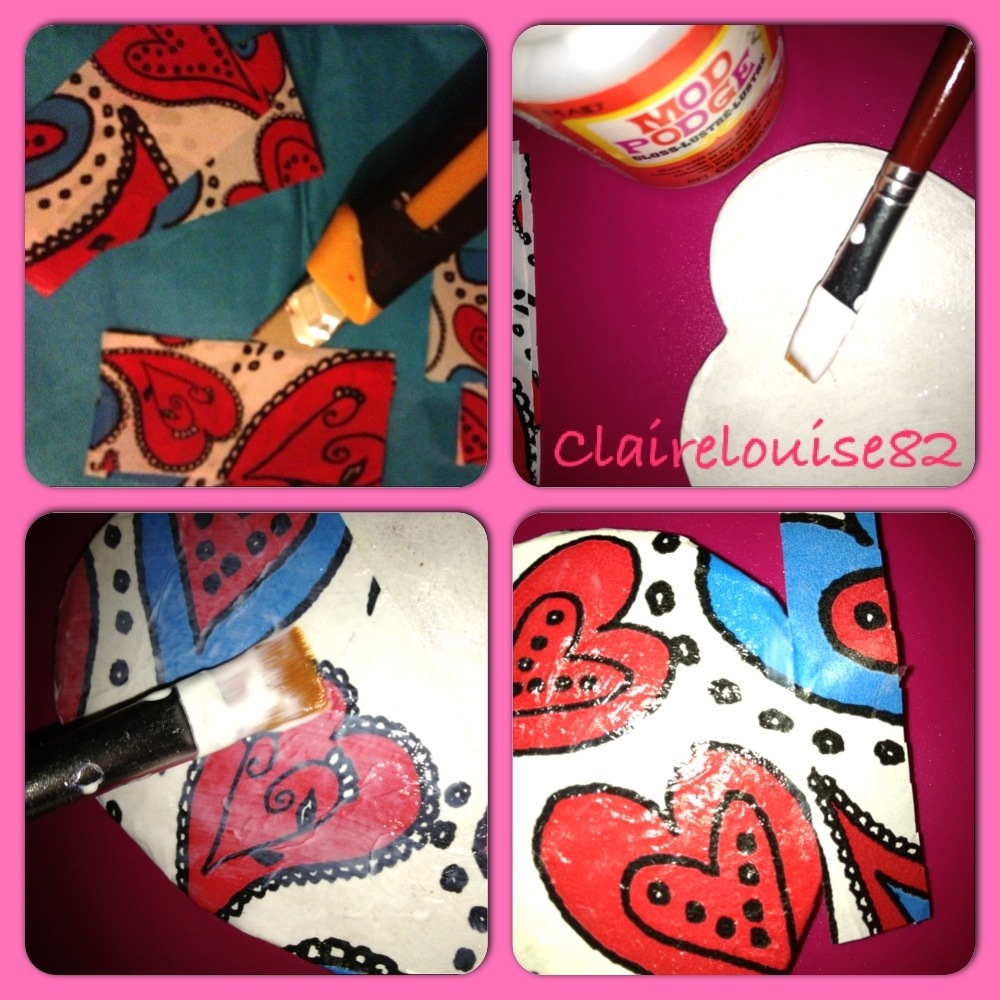
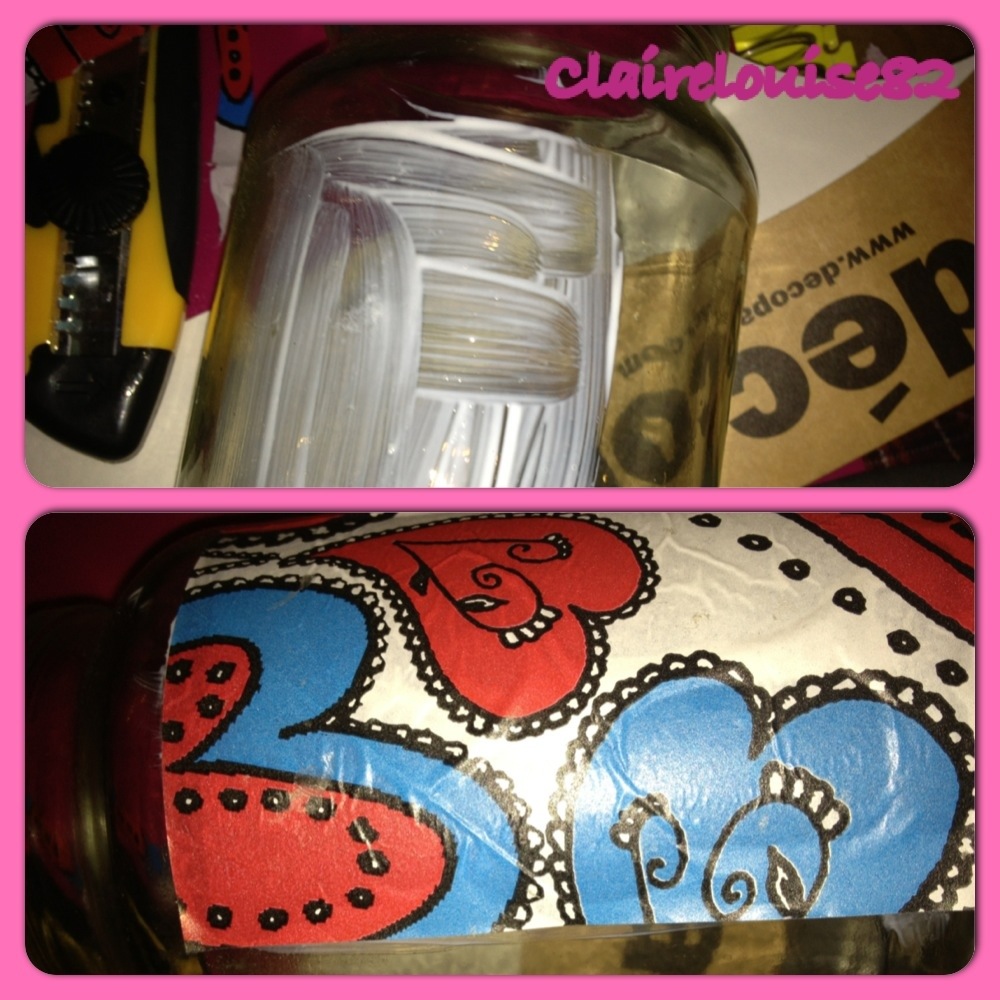
1) Give your heart magnet 2 coats of white acrylic paint as abase. Allow to dry in between coats and be careful not to get any paint on the actual magnet as it may affect how magnetic it is.

2) Take a sheet of your Decopatch paper (comes in a packet of three) and cut in half using a craft knife and ruler fir support. Place one piece aside for your jar. Now with a craft knife and ruler cut paper into squares so that you can easily piece them back together like a jigsaw.

3) With Mod Podge or Decopatch glossy glue get Decopatching. I’ve explain the art of using Decopatch to decorate almost any object or surface in numerous post here before. So, without going into to much detail I’ll explain in brief… Basically cover the heart in mod podge, lay the paper onto the heart and apply another layer of glue over the top. For this project you will want the pattern to be perfect (not all mix match) So join the paper together to form the pattern (like wallpapering).
Tips… Only apply the glue to the area you wish to cover, instead gluing each section as you go therefore avoiding any areas starting to dry and becoming tacky.

20130206-003418.jpg

If you have small areas in need of covering, then patch them up with small strips of paper.

Now leave to dry.

Note. Decopatch Glossy Glue & Mod Podge (gloss) can both be used as a glue sealer and finish. Both glues dry clear and are both easy to use. I’m using mod podge as its much faster when drying.

4) Once dry add another layer of mod podge and leave it for around 20 minutes to dry.

20130206-003527.jpg

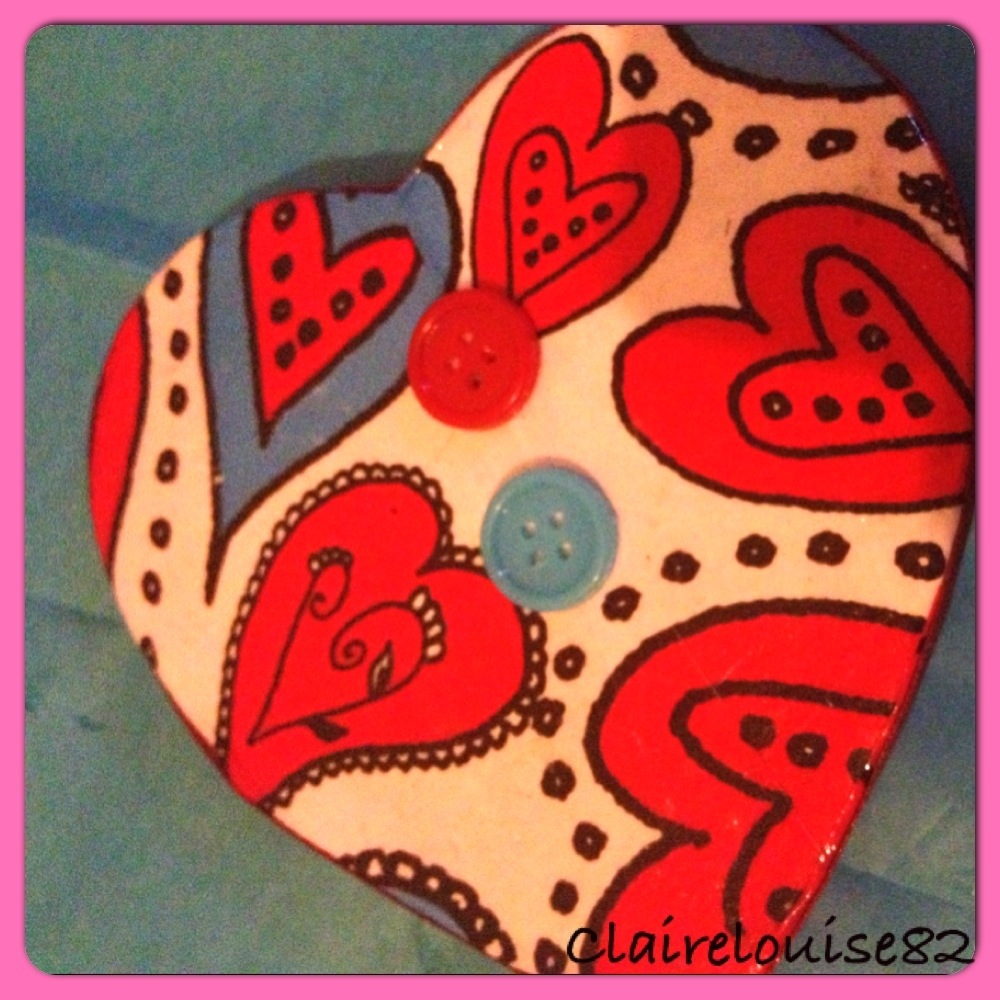
5) Once dry take the dark red ribbon and run it around the sides of your heart starting at the tip. Cut any excess ribbon and then use the mod podge to add the ribbon to the sides of the heart adding a layer of mod podge over the top of the ribbon too.

Leave to dry for 20 minutes or so.

20130206-003616.jpg

6) Once dry stick your self adhesive buttons to the front of your heart like so. Now place to one side.

20130206-003727.jpg

Now for the jar….

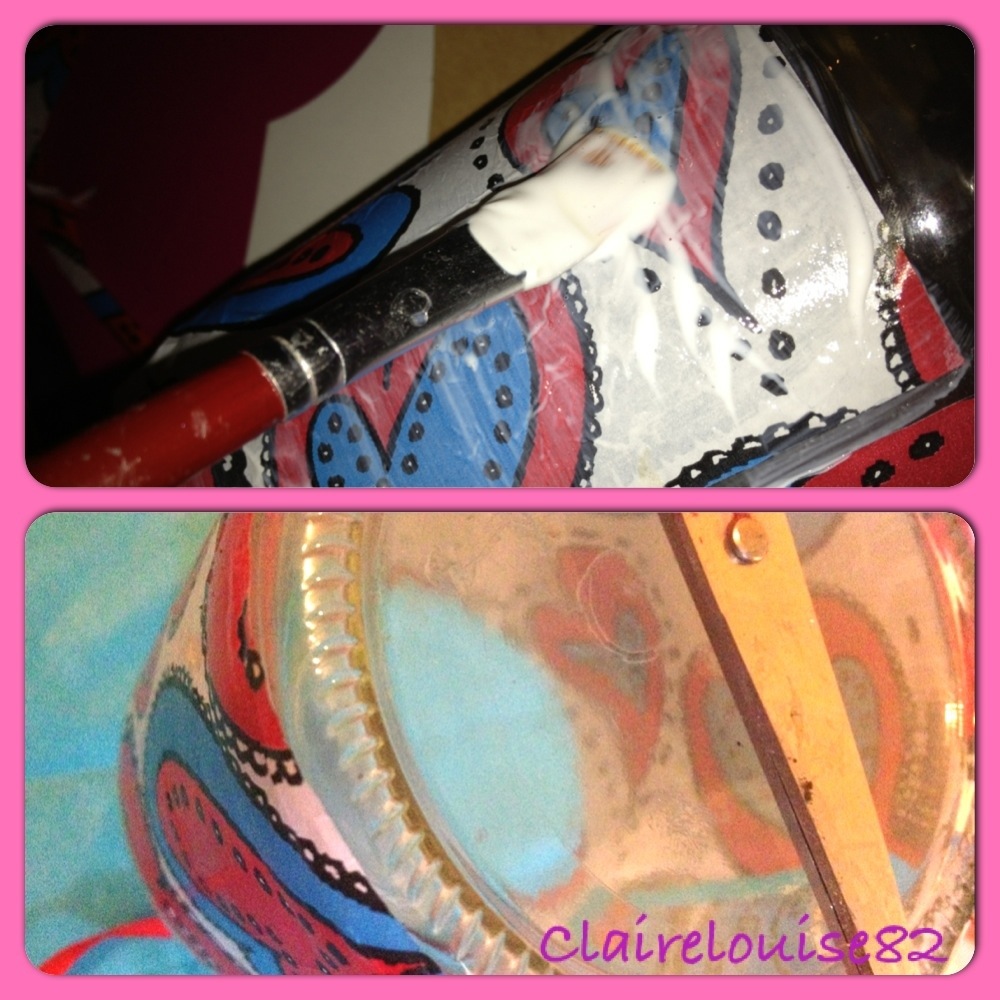
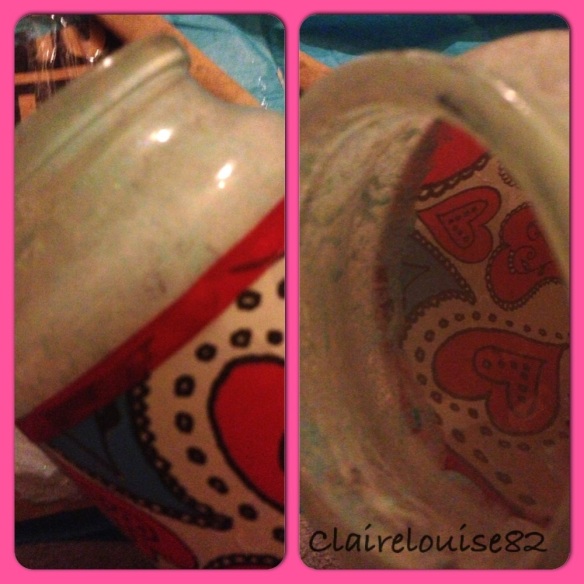
7) Bring forward your other half of Decopatch paper and wrap it around your jar. Start around 5 centimetres down from the neck of your jar so that the paper stops 3/4 of the way up leaving a small area unpapered. Only once you are sure its right add mod podge directly to the jar applying the paper as you go. (Apply the paper as a whole by rotating the glass, gluing and papering as you go). You will notice that you have a little excess paper at the bottom of your jar. Don’t worry! This will be removed soon. Now, add a top layer of mod podge over the top of the paper (ignoring the excess paper) and leave to dry for 20 minutes. Once dry add another top layer of mod podge and sit to dry for the same amount of time as before.

20130206-003836.jpg

8) Once your jar is papered and the mod podge is dry the paper will be stronger and look very glossy. Now use you scissors to remove any excess paper from the bottom of the jar as to tidy it up.

20130206-003953.jpg

9) apply mod podge around the top section of paper like a boarder. It only needs to be as thick as your thin red ribbon. Wrap the ribbon around the top of the paper and wipe any excess mod podge quickly with a sponge, to avoid it drying. Now apply mod podge over the top of the ribbon again wiping away excess as you go. Leave to dry for around 15 minutes.

20130206-004049.jpg

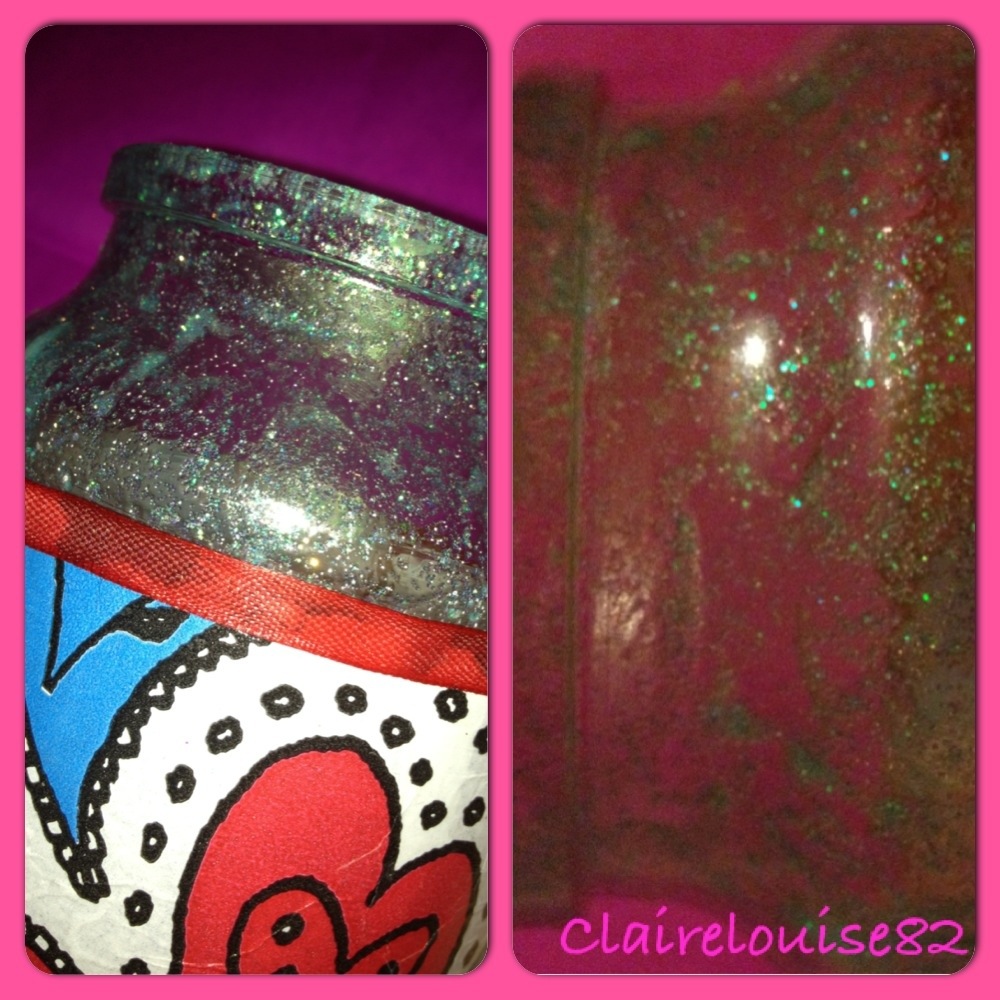
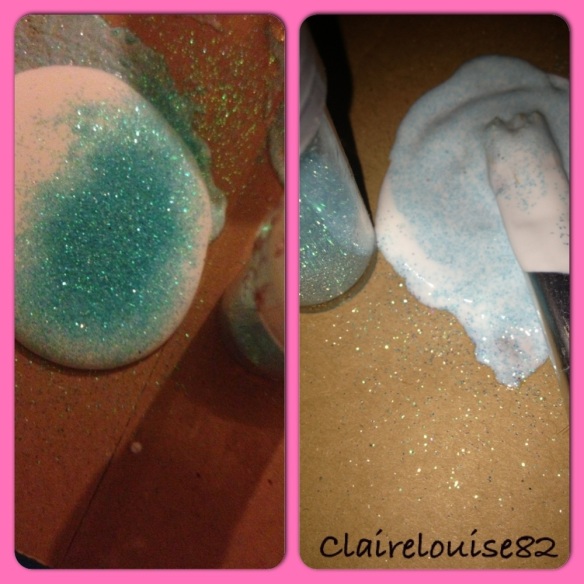
10) Now mix some mod podge with lots of the baby blue glitter. Apply this to the inner section of the jar that is still visible. Also apply some around the neck and top rim of your jar. The mod podge will dry clear leaving a crystallised glittery effect. Drying time is longer as the glue is thicker and no paper is applied. Mine took a few hours to dry fully.

20130206-004139.jpg

20130206-004304.jpg

11) once dry tie your blue ribbon around the neck of the jar into a pretty bow.

Dried Mod Podge Mixture

20130206-004352.jpg

20130206-004459.jpg

12) for the top section of the lid, place the lid face down on some heart Decopatch paper and with a pencil lightly draw around it. Once done carefully cut out the circle with a craft knife. Decopatch your cut out circle to the top of the jar again adding two top layers of mod podge to the top of the paper. Leave to dry for 20 minutes.

20130206-004704.jpg

13) Fill with Sweets or anything else you like (tea lights, makeup, pamper goodies, cookies) and fit lid.

Now just use some pretty tissue paper to wrap your heart and jar, place in a pretty gift bag ready to give as a gift.

20130206-004821.jpg

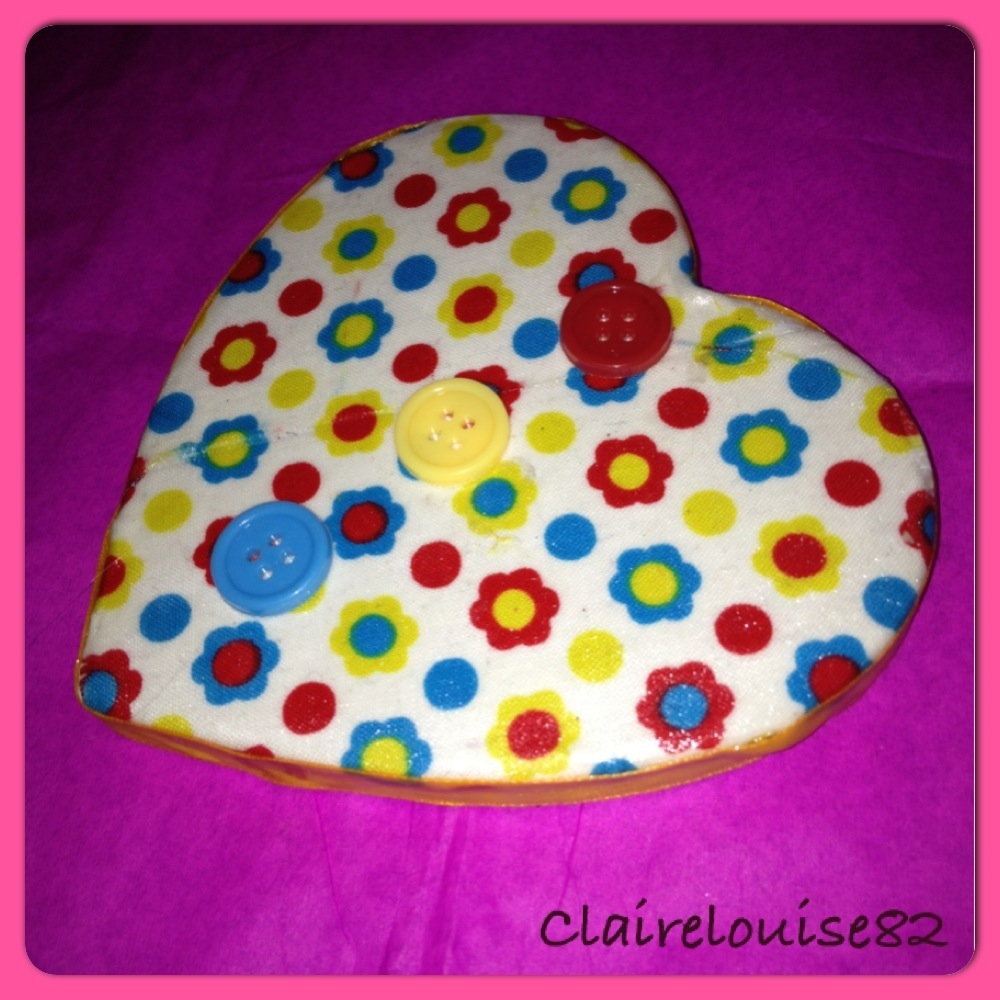
Fabric Flower Power Heart Magnet

You will need…

1 Large paper mâché heart magnet (Hobbycraft)

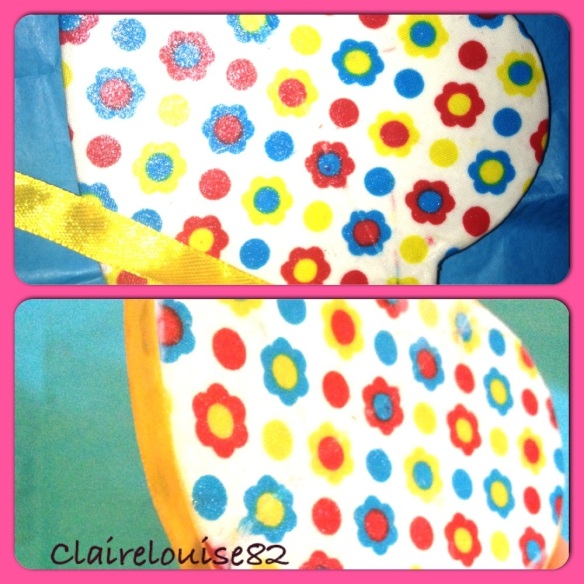
Some funky flower fabric (enough to cover heart) Mine is from eBay

Medium thick orange ribbon (Baker Ross)

3 Self adhesive buttons that coordinate with your fabric (I used red, yellow, baby blue) from Baker Ross

White acrylic paint

Mod podge

Tools…
2 brushes (for paint and mod podge)
Scissors
Craft Knife
Ruler

1) Paint heart in white paint as before.

20130206-004909.jpg

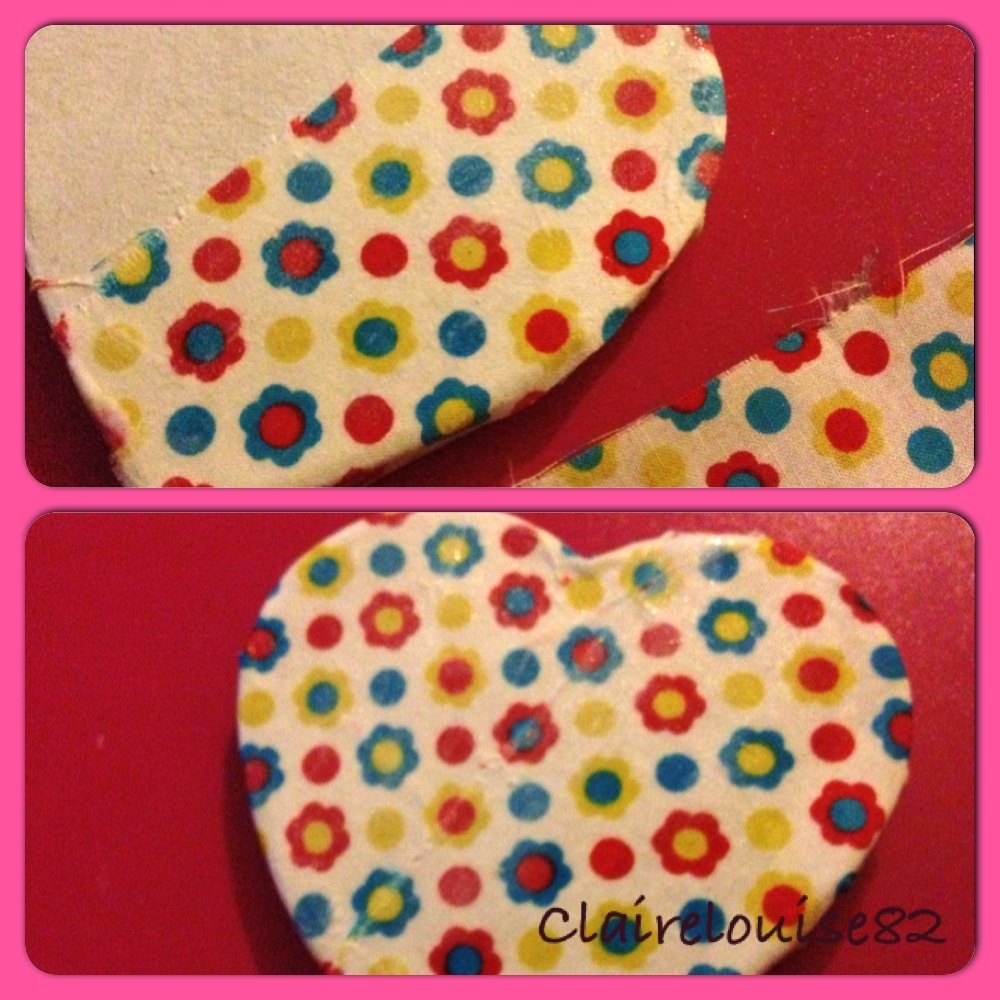
2) use a ruler and craft knife to cut fabric into two pieces one 3/4 in size and the other 1/4 in size. Use ruler to support fabric as you cut. Remove any frying.

3) cover 3/4 of your heart in mod podge placing the 3/4 piece of fabric on top at an angle so that only a 1/4 of the heart is left to cover. If fabric comes over the edges trim or just stick down as I have done. Add mod podge to both the heart and the top layer of fabric just as we did the decopatch paper.

4) Mod podge other 1/4 of heart and add the other half piece of fabric joining the pattern. Again add a coat of mod podge to the top layer of fabric working in the same way as the first piece. Leave to dry for around 20-30 minutes.

20130206-004948.jpg

5) Once dry add the ribbon to the sides of the heart as we did for our retro patterned heart above. Leave to dry for 10-15 minutes.

20130206-005028.jpg

6) Now stick on your three buttons like so and you’re heart magnet is set to go.

20130206-005100.jpg

20130206-005256.jpg

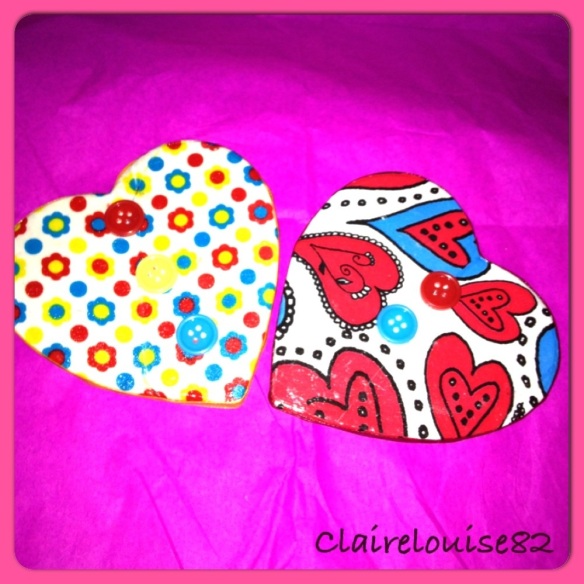
So… There you have it. Some fantastic Valentines handcrafted inspiration.

Have you made anything for Valentines Day?

20130207-225741.jpg