Tutorial – Decopatch Friendship Heart Pendants

Over Easter I shared with you all some crafts inspired by Polystyrene eggs. While shopping in the town centre when enjoying a recent holiday to Butlins in Bognor Regis, I popped into the ‘Works’ Where I uncovered these cute little polystyrene hearts.

Having recently used polystyrene miniature eggs to create Egg pendants with the children, it gave me an idea for a crafty project for these hearts.

The idea… Heart Friendship Pendants!

20130423-194029.jpg

If you fancy a go at these yourself, they are relatively easy to make just a little fiddly if anything. Its the perfect craft to do with bigger kids. Alice who is 10 had lots of fun making hers.

Here’s what you’ll need to make two pendants like ours…

2 designs of decopatch paper (your choice of design and colours)

Decopatch Glue

Mod Podge Shimmer (gold)

Glue/Decopatch Brush

Tiger Wire/Craft Wire

fishing Wire

Tiny Gold Beads

Glass beads

Glass crystals (colours to complement Decopatch paper)

5 x 4mm flat backed crystals (colours to complement decopatch paper) I used white and blue.

Jewellery Findings (couple of crimping beads and crimp covers, 2x pendent attachment, jump hoops, 2x clasps & catches)

Tools…

Crimping tool
Brushes
Scissors
Nail (to pierce a hole through hearts)

Here’s how to put it all together to make your heart pendents

1) Use a sharp nail to pierce 2 small holes opposite one another, right at the top of your hearts in the centre, like so…

2) Cut papers into small manageable pieces. Decopatch your hearts using your paper pieces and decopatch glue. This is done by simply adding glue directly to the heart and over the top of the paper. Cover one side of pendants, allow to dry for 30-40 minutes before doing the other sides.

When it comes to covering the sections of the hearts where the two holes are located, do this using the nail to locate the holes and piercing the paper.

20130423-193135.jpg

3) Once these are dry use a clean brush to apply a thin layer of Mod Podge gold shimmer. Apply to one side of the hearts, leave it to dry for 30 minutes before adding the shimmer to the opposite sides and again leaving to dry.

4) while the pendants are still wet, secure your 3 4mm flat back crystals in a row down the centre of one side of one of your pendants and the remaining crystals onto your remaining heart pendant in the same way. Now leave to dry.

20130423-193227.jpg

5) Now take your two tiny gold beads and insert into the two holes with the holes facing up.

6) next take your pendant attachments and fit them to the hearts via the holes on the gold beads.

7) Next, take some fishing wire (enough to make desired necklace length) and thread it through each of your pendants hoops

20130423-193312.jpg

8) Now thread on your glass beads and crystals like so. Five on each side looks nice. Do the same for your second necklace in a different style.

9) Make a knot on both ends of the wire while you prepare your findings.

10) Finally connect your crimps and covers, jump loops and catches. Sit back and admire your work.

20130423-193438.jpg

We made 2 heart necklaces as Alice-Sara wanted to make these for herself and best friend as friendship necklaces.

20130423-193354.jpg

The thing I love most about this project is the endless possibilities it brings. You can make a different heart for each day of the week just by changing the paper style or beads and crystals on your necklace.

What’s more, with the magic of Decopatch glue and Mod Podge your polystyrene heart is now stronger and much more solid, but still super light to wear.

Why not try it yourself, experimenting with different papers and beads as you go.

Hope I’ve inspired you to get creative with Decopatch papers… Enjoy.

Tutorial – Easter Baskets With A difference

I love Easter, Spring is in the air and Daffodils can be seen sprouting from the ground beside that of the Bluebells. Its the day you’re technically allowed to scoff our faces with chocolate and not feel so guilty about doing so!

However, lets be honest, it isn’t the healthiest tradition is it? And as a woman, I always beat myself up a little following the Easter Binge. Nonetheless, there are many other cute gift ideas that can be given at Easter, ones that don’t actually involve any chocolate at all! Whats more, you can actually craft many of these gifts yourselves making them that bit more personalised and special.

I made a cute Easter basket that I filled with decorated eggs and then shared here on the blog last year.

Today I’m creating an Easter basket of a different kind! One a bit different from the norm. I guess you could call it a bag, though its Easter themed all the same.

So here it is!

20130316-005105.jpg

A very cute Box bag decorated with spring and Easter in mind, then filled with cute little treats for my daughter.

To make your own its really very simple, all you’re need is…

1x Paper Mâché box bag (Hobbycraft)
1x Sheet of decorative paper (A4)
White String (Ikea)
1x Birdie tag with button detail (dotcomgiftshop)
2x Cute paper jar lid covers that are identical to one another (dotcomgiftshop)
Mod Podge Gloss (Hobbycraft)
Pink Paint (pastel pink is best)
1x Sheet of yellow felt ( Baker Ross ltd)
1x Sheet of yellow tissue paper
A few glue dots

Tools…
Paint and glue brushes
Scissors

Other items include gifts to place in your box bag. I’ve filled mine with little bits like bath lotions and bubbles, mini nail polishes and bangles.

20130316-005423.jpg

First paint the sides of your box in pink paint. Also paint the edging of the box. Leave to dry and then apply a second coat.

Cut off the boxes paper handles and discard.

Next cut you’re decorative A4 paper in half (I’ve used a nice sheet of pastel Polkadot paper in A4 size). Now line it up to the top edge of the box, roughly trim excess paper but be careful not to trim too short. Once you have applied the paper we can then trim of any remaining excess. To apply the paper, paste on a coat of mod podge gloss and apply the paper to the boxes front. Add a second coat of mod podge over the top and leave for 30 minutes to dry. Don’t worry about applying the paper over the holes that housed the paper handles, this is fine, we will address this later.

20130316-005256.jpg

Once dry repeat the entire process on the opposite side of your box.

Once you have papered both sides of the box and it is dry, hard and shiny, trim off any excess paper to make your box tidy.

Now take one off the jam jar covers. You should have two identical paper covers, one for either side of your box (mine has this cute birdie in the centre and came in an assortment of jar preserving labels from dotcomgiftshop). In the same way you applied your paper to your box (glue both on the surface and over the top off the paper) repeat for both sides and leave for half an hour to dry.

20130316-005534.jpg

Once this has completely dried use the point of a thin paint brush to push through the paper and expose the holes for the handles. As the inner section of the box has not yet been covered these are easily located. Do this for all four of your holes.

Now cut some yellow felt and lay it at the bottom of the box. Repeat for the two larger inner sides only this time secure with a few glue dots on each.

At this stage don’t worry about the remaining two sides (smaller inner sides)

Now take a sharp pointed craft tool, the point of a sharp pair of scissors or even a sharp pencil to push through the exposed holes penetrating the felt lining on the inner section of the box.

Now you will need to cut 2 white pieces of string (mine is from Ikea). Cut these to a size that suits. I’ve opted for short handles. Simply thread the string through the holes so one piece goes from one side of the box to the other (as the original handles were before removing). Do this for both pieces only on one piece, tread through one hole and before treading through the opposite side, tread on your little cute birdie tag so the decorative side is seen when it lays flat against your box. Tie all the ends of the string so the handles are secure. Make sure the string attached to your little birdie tag is on the piece of string you’ve tied off to ensure it doesn’t move around the handle freely.

20130316-005725.jpg

Lastly cut your yellow tissue paper and use to bulk out the inner sections of the box while also covering the remaining sides. This will also keep your surprise gifts cushioned and ever so slightly concealed from little wondering eye.

20130316-012352.jpg

Cute Easter Surprise wouldn’t you agree?

20130316-012446.jpg

Decopatched Valentines Gifts Made With Mod Podge

20130206-005216.jpg

As some of you who visit the blog may have already guessed, this girl loves hearts, and what with it coming up to valentines day, its the perfect excuse to get crafty with hearts. Today I’ve decided to make some pretty sweetie jars with matching heart magnets.

The Jar is one I’ve had ready to decorate for some time. I brought a few of them on a bric a brac stall at a bootfair last year.

The hearts are made of paper mâché and already have the magnets attached. They are of a good size and once papered, look amazing on the fridge or a magnetic notice board. These can be brought from Hobbycraft and are available both in store and online.

So for this project I used 2 large heart magnets and 1 jar. (Pairing a jar with a magnet to make a gift set)

Both the gift set and Individual magnet have been decorated differently but were both extremely simple to create.

20130206-005127.jpg

The first Tutorial is for my Retro Heart Magnet and Jar Gift Set.

You will need…

Medium size jar (the type with a glass stopper lid)

Large sized paper mâché heart magnet (Hobbycraft)

Funky heart Decopatch paper (Hobbycraft)

Ultra fine baby blue glitter

Mod podge (Gloss)

Thick – Satin blue ribbon (Baker Ross)

Bright red ribbon (Thin)

Dark red ribbon (medium thickness)

1 Red & 1 blue self adhesive button (baker Ross)

White acrylic Paint

Sweets or other items to fill jar

Tools…

Craft Knife
Scissors
3 Paint brushes (painting, mod podge, glitter)
Small sponge (to wipe excess mod podge)
Ruler
Pencil

First the heart magnet….

1) Give your heart magnet 2 coats of white acrylic paint as abase. Allow to dry in between coats and be careful not to get any paint on the actual magnet as it may affect how magnetic it is.

2) Take a sheet of your Decopatch paper (comes in a packet of three) and cut in half using a craft knife and ruler fir support. Place one piece aside for your jar. Now with a craft knife and ruler cut paper into squares so that you can easily piece them back together like a jigsaw.

3) With Mod Podge or Decopatch glossy glue get Decopatching. I’ve explain the art of using Decopatch to decorate almost any object or surface in numerous post here before. So, without going into to much detail I’ll explain in brief… Basically cover the heart in mod podge, lay the paper onto the heart and apply another layer of glue over the top. For this project you will want the pattern to be perfect (not all mix match) So join the paper together to form the pattern (like wallpapering).
Tips… Only apply the glue to the area you wish to cover, instead gluing each section as you go therefore avoiding any areas starting to dry and becoming tacky.

20130206-003418.jpg

If you have small areas in need of covering, then patch them up with small strips of paper.

Now leave to dry.

Note. Decopatch Glossy Glue & Mod Podge (gloss) can both be used as a glue sealer and finish. Both glues dry clear and are both easy to use. I’m using mod podge as its much faster when drying.

4) Once dry add another layer of mod podge and leave it for around 20 minutes to dry.

20130206-003527.jpg

5) Once dry take the dark red ribbon and run it around the sides of your heart starting at the tip. Cut any excess ribbon and then use the mod podge to add the ribbon to the sides of the heart adding a layer of mod podge over the top of the ribbon too.

Leave to dry for 20 minutes or so.

20130206-003616.jpg

6) Once dry stick your self adhesive buttons to the front of your heart like so. Now place to one side.

20130206-003727.jpg

Now for the jar….

7) Bring forward your other half of Decopatch paper and wrap it around your jar. Start around 5 centimetres down from the neck of your jar so that the paper stops 3/4 of the way up leaving a small area unpapered. Only once you are sure its right add mod podge directly to the jar applying the paper as you go. (Apply the paper as a whole by rotating the glass, gluing and papering as you go). You will notice that you have a little excess paper at the bottom of your jar. Don’t worry! This will be removed soon. Now, add a top layer of mod podge over the top of the paper (ignoring the excess paper) and leave to dry for 20 minutes. Once dry add another top layer of mod podge and sit to dry for the same amount of time as before.

20130206-003836.jpg

8) Once your jar is papered and the mod podge is dry the paper will be stronger and look very glossy. Now use you scissors to remove any excess paper from the bottom of the jar as to tidy it up.

20130206-003953.jpg

9) apply mod podge around the top section of paper like a boarder. It only needs to be as thick as your thin red ribbon. Wrap the ribbon around the top of the paper and wipe any excess mod podge quickly with a sponge, to avoid it drying. Now apply mod podge over the top of the ribbon again wiping away excess as you go. Leave to dry for around 15 minutes.

20130206-004049.jpg

10) Now mix some mod podge with lots of the baby blue glitter. Apply this to the inner section of the jar that is still visible. Also apply some around the neck and top rim of your jar. The mod podge will dry clear leaving a crystallised glittery effect. Drying time is longer as the glue is thicker and no paper is applied. Mine took a few hours to dry fully.

20130206-004139.jpg

20130206-004304.jpg

11) once dry tie your blue ribbon around the neck of the jar into a pretty bow.

Dried Mod Podge Mixture

20130206-004352.jpg

20130206-004459.jpg

12) for the top section of the lid, place the lid face down on some heart Decopatch paper and with a pencil lightly draw around it. Once done carefully cut out the circle with a craft knife. Decopatch your cut out circle to the top of the jar again adding two top layers of mod podge to the top of the paper. Leave to dry for 20 minutes.

20130206-004704.jpg

13) Fill with Sweets or anything else you like (tea lights, makeup, pamper goodies, cookies) and fit lid.

Now just use some pretty tissue paper to wrap your heart and jar, place in a pretty gift bag ready to give as a gift.

20130206-004821.jpg

Fabric Flower Power Heart Magnet

You will need…

1 Large paper mâché heart magnet (Hobbycraft)

Some funky flower fabric (enough to cover heart) Mine is from eBay

Medium thick orange ribbon (Baker Ross)

3 Self adhesive buttons that coordinate with your fabric (I used red, yellow, baby blue) from Baker Ross

White acrylic paint

Mod podge

Tools…
2 brushes (for paint and mod podge)
Scissors
Craft Knife
Ruler

1) Paint heart in white paint as before.

20130206-004909.jpg

2) use a ruler and craft knife to cut fabric into two pieces one 3/4 in size and the other 1/4 in size. Use ruler to support fabric as you cut. Remove any frying.

3) cover 3/4 of your heart in mod podge placing the 3/4 piece of fabric on top at an angle so that only a 1/4 of the heart is left to cover. If fabric comes over the edges trim or just stick down as I have done. Add mod podge to both the heart and the top layer of fabric just as we did the decopatch paper.

4) Mod podge other 1/4 of heart and add the other half piece of fabric joining the pattern. Again add a coat of mod podge to the top layer of fabric working in the same way as the first piece. Leave to dry for around 20-30 minutes.

20130206-004948.jpg

5) Once dry add the ribbon to the sides of the heart as we did for our retro patterned heart above. Leave to dry for 10-15 minutes.

20130206-005028.jpg

6) Now stick on your three buttons like so and you’re heart magnet is set to go.

20130206-005100.jpg

20130206-005256.jpg

So… There you have it. Some fantastic Valentines handcrafted inspiration.

Have you made anything for Valentines Day?

20130207-225741.jpg

Ten Things I Love To Make & Do

So, here’s 10 things I love to make and Do… excluding anything to do with my children, friends and family as that’s just obvious now isn’t it!

Number 1: Antiquing (furniture refurbishing)

Yes, one of my latest hobbies is to buy old vintage furniture and refurbish it into shabby chic loveliness. My latest projects are a 1950s dressing table, chest of draws and a set of bedside draws all of which I plan to refurb with Annie Sloan chalk paint in the colour Paris Grey.

Below, Paris Grey Table I’m working on

20130204-030440.jpg

Number 2: Jumble Sales & Bootfairs

I love digging through the treasure at the local jumble sale, I’ve had some amazing finds at both bootfairs and jumble sales… Not forgetting the odd charity shop.

Below, A wicker Basket Full Of Pretty Vintage China From Jumble Sales, Bootfairs And Auctions

20130204-032913.jpg

Number 3: Blogging:

Of course… Blogging is a big love hence the reason I blog both here and at my long running blog A boy with Aspergers.

Below, Collecting A Mad Blog Award For My Blog ‘A Boy With Aspergers’ In 2011

20130204-031812.jpg

Number 4: Candle & Soap Making

Soap making is a relatively new hobby but I’ve been into candle making since I was about 8 years old and make every thing from scented tea lights to candles in vintage tea cups

Below, Pretty Decopatch Jar Candle

20130204-033132.jpg

Number 5: Jar Craft

I love jars and the many uses they provide. I store everything from craft bits and bobs to cup cake sprinkles in them. I’ve decopatched mason jars and upcycled spice jars.

Below, Homemade Sweetie Jar Gift

20130204-032626.jpg

Number 6: Drawing and Painting

Since I was at nursery I’ve loved to draw and paint. I love creating art whether using spray paints and stencils, acrylics or pastels.

Below, Spray Painting

20130204-030820.jpg

Below, Pencil Drawing

20130204-031657.jpg

Number 7: Decopatch

The modern take on decoupage, I use Decopatch papers to decorate everything from paper mâché hearts to twinket boxes.

Below, Decopatch Frame With Corsage Detail

20130204-030701.jpg

Number 8: beading

You don’t need to be good at something to enjoy it. Beading isn’t something I do particularly well (well, when it comes to jewellery making that is)! But I’m still learning and having fun in the process.

Below, Handmade Clay Beads

20130204-032800.jpg

Number 9: Photography (Ok, this ones a tiny bit family focused though not entirely)

I’m no great photographer and despite Having a relatively good camera you will catch me using my iPhone half the time. However, I don’t do it as an art as such, or to make any pennies! I take pictures because I love to capture a moment. Moments with my children, family and friends. Images that make me smile when every single time I look at them, no matter how long down the line that may be.

Below, Penguin Taken On A Family Day Out At London Zoo

20130204-032235.jpg

Below, Image Of My Daughter

20130204-032405.jpg

Below, Another Image Of My Daughter That I Edited On Photo App

20130204-032504.jpg

Number 10: Entering Skill Based Competitions

I just love a creative comp, there are so enjoyable to take part in plus you can win so amazing prizes. Past prizes for me include cash, shopping vouchers and toys. Check back here on the blog from time to time as I often feature some great online competitions all requiring some kind of skill.

Below, A Fun Cath Kidston Competition Entry

20130204-032005.jpg

Below, My Daughter In A Homemade Halloween Costume For Creative Comp

20130204-032124.jpg

Shabby Chic Inspired Mod Podge & Decopatch Tea Light Jars

20130124-225416.jpg

I love using Decopatch papers to decorate items and surfaces. I had some pretty pink rose Decopatch paper left from another project and decided to use it to make some pretty tea light jars to match my heart twinklets I made a while back.

The results were fabulous and I was left with a really pretty tea light jar that I now plan to make more of.

Regardless of the beautiful result, these tea light jars are relatively simple to make and don’t require very many materials to create.

Here’s what you will require to make one of these tea light jars…

Small jar (Ikea spice jars are ideal)
Decopatch pink rose paper
Mod Podge
Hot pink fine glitter

Tools…

Scissors
Hog brush for Mod Podge

How to make your own pretty candle jar…

1) Cut your rose paper into medium size pieces.

20130124-224608.jpg

2) Apply Mod Podge directly onto the glass jar in the area you want to apply your first piece of Decopatch paper.

3) Once you have stuck down the paper, add a thin layer of Mod Podge over the top.

20130124-224739.jpg

4) Continue doing the above steps in till your jar is completely covered.
Be sure to slightly over lap the papers. Cut smaller pieces of paper for any patch ups. With this piece, try to ensure your papers at least match somewhat and the pattern doesn’t look too odd.

5) leave to dry for around 30 minutes

6) Once dry add a layer of Mod Podge around the jars neck and its bottom before sprinkling the fine pink glitter over the glued areas. Shake off any excess glitter.

20130124-224904.jpg

7) Now add a small amount of Mod Podge to the middle of your jar and then cover with a little glitter (few pinches). Now leave the jar to dry for another 30 minutes.

8) Once dry finally add a final thin layer of Mod Podge over your entire jar and leave to dry for an hour or more.

20130124-225024.jpg

9) Now, its dried, all that’s left to do is pop in a tea light and light it up with a candle lighter.

20130124-225158.jpg

As the flame take form you will notice how your candle jar begins to spakle with the light and glitter.The effect is simply stunning and I’m really pleased with mine.

20130124-225310.jpg

So… There you have it! Really cute tea light jars that are easy to make and don’t cost a fortune either. Why not make them for a loved one this Valentines Day?

Mod Podge Miniature Craft Jars

20130121-170446.jpg

So I recently brought these cute little jars from ikea. They came in a set of 4 and were a bargain at under £2.

20130121-170633.jpg

Although they are very sweet and all, I felt they could do with a little decorating.

The jars could be used for anything but were advertised as a set of spice jars. I’ve however decided that they would make great little craft jars, perfect for buttons, sequins, pins and more.

To decorate my jars I used a number of different items… Here’s what you will need to make yours…

Ikea set of 4 spice jars ( from the marketplace)

And to decorate…

Section of patterned papers
Mod Podge Gloss
Paper Lace Trimming
Ribbon
Selection of embellishments (I used card buttons, a foam butterfly and a couple of sequins)

Firstly chose your papers. I’m aiming for a real girly design with floral papers that give the jars a bit of a shabby feel.

Take the lid of your jar and use it as a template to draw around leaving a circle template on your chosen paper. Do this 4 times, once for each jar.

20130121-165908.jpg

Carefully cut out your circles and use mod podge Glossy Lustre to secure to your jar. The circle shape on the jar is the same size as the lid so the paper is a perfect fit. Add the mod podge to both sides of the paper using a decoupage technique.

20130121-165954.jpg

Leave all to dry for around 30 minutes then add your finishing touches.

I’ve done the following…

Added lace paper trimming, and ribbon around the centre of each jar.

20130121-170044.jpg

I’ve used embellishments to decorate the front of each jar. I’ve secured each embellishment to the middle of the jar where i’ve covered each one with paper. I did this by using the mod podge and again using the Decopatch technique.

20130121-170128.jpg

Be sure to let your jars dry fully before filling with your craft bits and bobs.

20130121-170223.jpg

2 of my finished jars are currently being used to store buttons, another is used for small cotton reels and mini pegs, where the last is housing some of my glass beads.

20130121-170329.jpg

I really like the results. The jars are very easy to decorate and provide me with a great little storage solution.

Pretty don’t you think?

20130121-170828.jpg

How Too Use Decopatch To Decorate Paper Mâché Letters

20130118-191302.jpg

I love working with Decopatch and always get excited when ordering new papers.

I visited one of my favourite stores last weekend… Hobbycraft! Floors and floors of crafty loveliness. Sadly there wasn’t many decopatch papers in stock as it seems everyone has taken up the hobby of late. I did buy some more rose patterned papers and a gorgeous set of funky heart papers, perfect for valentines. They also had lots of paper mâché shapes and boxes in the sale. I grabbed some more hearts, a few tiny picture frames, 3 gift boxes/gift bags, a heart embossed box and some great large Decopatch letters.

Most of the items I’ve covered in Decopatch paper have been covered in just the one pattern or colour, this time I wanted to cover the letter “A” in a variety of different paper designs to create a really funky design for my daughters bedroom. I was planing to buy all the letters to spell out the name Alice which I was planing to hang on her wall but sadly they didn’t have the letter “L” so I designed just to do the one letter that she can hang on her door or free stand on her dresser or chest of draws.

Luckily I had a nice collection of left over paper pieces that ranged from pretty shabby pink and floral prints to funky denim and bold star designs… Perfect for what I had in mind!

Here’s what I used…

Paper mâché large letter (A)
Lots of odd pattern Decopatch paper pieces
Antique cream paint (white is perfect)

Tools
Deco patch glossy glue
Glue brush
Paint brush
Scissors

I’ve spoken about how to work with Decopatch before on the blog. So with this I won’t go into to much detail here in fear of boring you all.

Basically I cut my random pieces of paper into various sizes shapes and sizes.

20130118-190544.jpg

Before applying these to my paper mâché I painted the letter in an antique cream colour with acrylic paint. I would have just used white but because I only had white spray paint and didn’t fancy chocking oneself I opted for the cream instead.

My reason for painting the paper mâché is because its rather dark before beforehand and some of my papers were quite light. This is why Taking the time to give your paper mâché a quick lick of paint makes sense! It may be more preparation and time but you save on papers (these are not cheap) plus its easier later on.

I find that acrylic paint is really fast to dry so I was able to get started within a an hour of painting the paper mâché letter.

20130118-190358.jpg

I do enjoy Decopatch but its so messy and I often end up looking like I have skin melting of the tips of my fingers. I worked on one side at a time, adding a layer of glue to my base and one over the paper to seal in place, slightly overlapping each piece along the way.

20130118-190712.jpg

20130118-190819.jpg

I decided not to rush my letter letting each side dry fully before starting another. While your Decopatch paper is wet it is more likely to rip especially when the glue is drying with your finger tips stuck to it! Hence the reason patience was important.

20130118-190934.jpg

I worked on all sides in the same way patching up any gaps with tiny pieces of paper.

20130118-191100.jpg

I decided to give it another glossy coat of glue once finished and then left over night to dry.

Funky wouldn’t you say?

20130118-191204.jpg

A Postcard From Santa

20121216-214529.jpg

My Daughter Alice-Sara Is one creative little lady. At age 9 she loves to engage herself in arts and crafts, So, is always on the lookout for any creative competitions.

When we discovered the latest competition from TravelSupermarket.com Alice just couldn’t contain her excitement as she sat down to jog down a couple of ideas for her creation.

Once she had decided what she wanted to do she raided the craft cupboard for her desired materials and got to work.

20121216-214002.jpg

However, This was no easy task! Her masterpiece needed to be created over the space of a couple of days due to all the different materials she chose to use. These both requiring a mixture of acrylic paints and gloopy glue as well as added addition of Decopatch meant there was many drying periods to the timetable.

This was a collage of various materials that together formed a great picture of Santa enjoying his well earned Holidays in sunny Hawaii.

When asked about her design she gave some unsuspecting information such as Santas enjoying his holiday with his new girlfriend who just happens to be a mermaid lol.

I’m really proud of her creation as I always am. My creative daughter never fails to make a statement, has a wonderful imagination and is a dab hand with a paint brush.

I’ve uploaded a video of Alice working on her creation. The video explains her idea and she talks us through some of the stages of her creation.

She used many different materials to create a 3D effect made up of numerous textures. some being tissue paper, Self adhesive foam, embellishments, cotton pads, card and glitter. She also layered tissue paper with both Decopatch glossy glue and Metallic Turquoise acrylic paint that she mixed with ultra fine blue glitter.This was appiled using a sponging technique to give added texture to her dark blue tissue paper sea.

I love how she made Santa almost completely from Self adhesive foam. She very cleverly created his famous white beard with a cotton pad, gave him wiggly eyes and added flower embellishments to create a traditional Hawaiian necklace.

20121216-214139.jpg

20121216-214050.jpg

Her imagination was on top form as she also created a funky surf board with glittered patterned card to replace his traditional sleigh. Hand drawn Dolphins were cut from foam to create his Reindeer replacements. She then added some brightly coloured string to help the dolphins pull santa along the coastline.

20121216-214221.jpg

Other great ideas included the addition of real yellow sand to great her Hawaiian Beachfront and cotton pad clouds that she slightly pulled apart and glued upon her Metallic blue painted sky that again she added a few dashes of glitter too.

20121216-214303.jpg

Her Mermaid who is Santa’s special friend (seriously the video explains) was again hand drew onto card, cut out and stuck to some Self adhesive foam rocks… Of course she glittered her tale to give it that girly touch.

20121216-214425.jpg

20121216-213704.jpg

So there you have it… Our entry into the Postcard from Santa competition hosted by TravelSupermarket.com

As the rules state I must nominate 5 others to take part even though they only have a day to create… Sorry (busy week)

I nominate Mummybird
Tiredmummyoftwo
Mummyvswork
This mummy loves
Kneesupmotherbrown

Check out TravelSupermarket for some fabulous holiday days if you fancy a break like Santas.

Homemade Cath Kidston Inspired Christmas Baubles

My tree is extremely fun this year, I’ve let go and just gone with the flow! I’ve not tired myself down to a colour scheme or particular style as I usually would. seriously, this year its an explosion of colour and creativity with shop brought bright baubles, handmade wooden gingerbread hearts, shabby chic ornaments and dazzling home made snowflakes.

I must admit I’m feeling pretty proud to be out of my comfort zone. I love brights and this year I even brought neon baubles in funky pinks, blues greens and yellows. These mixed in with all our homemade crafts give the tree a very unique edge and I’ve got to admit I’m kinda loving it.

20121212-152809.jpg

Yes, my love of all things vintage and shabby chic would seem something of an odd mix with that of bright bold colours, but again the home made girly decorations of pastel yarn tied hearts and gingerbread men slot in rather nicely.

Some of my favourite decorations I’ve made this year are that of the Cath Kidston inspired shabby chic fabric covered glitter baubles in pretty pinks and creams. These fabric covered baubles have been glittered with shimmering golden Mod Podge with an added touch of ultra fine pink glitter dust making them beautifully unique.

20121212-153157.jpg

These are really extremely easy to create and a great way to upcycle them old baubles that have seen better holiday’s.

So here’s what you’ll need and some very quick simple instructions to get going and create your own baubles.

You will needs

Some old baubles (as many as desired)

Fabric scraps (Cath Kidston never fails to impress)

Selection of thick ribbon (long enough to tie around the middle conference of each bauble)

Selection of thin ribbon to hang baubles from your Christmas tree

Ultra fine glitter dust in pink (or whichever colour suits your fabric)

Mod Podge Shimmer (gold)

Decopatch Glossy Glue (optional as can just use the mod podge)

Tools

Glue brushes
Scissors
Embellishment sticky tabs

Your Baubles don’t have to be recycled as you can always pick up a bargain pack from your local PoundLand or equivalent. I also brought some great baubles for another craft project for 10p each in our local charity shop. Basically… If you have no baubles to Upcycle these can be picked up both easily and cheaply.

20121212-154441.jpg

Step 1 – once you have decided on your fabric, cut it into small pieces (size can vary depending on bauble size and desired style)

20121212-153510.jpg

Step 2 – Right, firstly add some mod podge to a mixing cup followed by a good few sprinkles of ultra fine glitter. mix well and cover till needed.

20121212-153647.jpg

20121212-154313.jpg

Step 3 – Now, given the mod podge is a gold shimmer with added glitter, you may feel its a waste to use it as the undercoat for glueing fabric. However if your using a bauble that has a very dark or prominent colour, then using the mod podge will help to prevent the colour gleaming through. I used just the shimmer mod podge for my pink bauble and both glossy Decopatch glue and shimmer mod podge for my cream bauble.

20121212-154801.jpg

Now start coating the bauble with your chosen glue. If working with both glues, use the Decopatch glossy glue for the undercoat and the mod podge for the outer coat (this requires patience as you will be required to continuously swap between brushes every few seconds). If using just mod podge then just paint it directly onto the bauble layering fabric and mod podge as you go.

20121212-155127.jpg

Note… The outer section should only have a thin layer of mod podge as this will be the baubles finish. If second coats are desired these can be applied only once your first coat is dry. This avoids bumps and drips forming. Also try to brush in pretty much the same directions to avoid noticeable odd looking brush marks.

20121212-155350.jpg

Step 4 – now attach a decoration hook or if you don’t have any some thread or ribbon (don’t worry you can change for prettier hanging ribbon later). You need to attach either one of the above now so that you are able to hang your baubles as to allow them to dry quickly and evenly. My mod podge only pink decoration was actually dry in an impressive 30 minutes where my cream bauble took considerably longer. I just left them both over night as they were decopatched in fabric just before I headed of to bed.

Step 5 – Once dry inspect baubles and if second coat of mod podge is required then again cover in a very thin layer and then allow to dry (do not add any more fabric just mod podge)!

Step 6 – Once all coats are applied and baubles are nice and dry, its time to add the finishing touches.

For each bauble take your chosen thick ribbon, cut down to size and wrap around the middle of your bauble (securing with a few glue dots or embellishment sticky tabs if needed). Now, tie into a centre bow. If desired, use a small piece of ribbon in the same colour to wrap around the centre of your bow. Secure in place with a glue dot or very small embellishment sticky tab. This will give the bow a really neat and tidy finish.

20121212-155705.jpg

20121212-155514.jpg

20121212-160216.jpg

Step 7 – now choose your thin hanging ribbon. for my pink bauble, I have gone for a striking thin pink ribbon to match my bow and a white glittery organza ribbon to hang my cream bauble. If you don’t fancy adding any more ribbon at all, yarn looks really effective! You could just use a decoration hook for a really easy and simple look.

20121212-155900.jpg

So, there you have it! Cath Kidston inspired fabric glitter baubles that are simple to create.

20121212-160352.jpg

20121212-160509.jpg

Shabby Chic decorations for my tree of randomness!

20121212-160848.jpg

Easy Handmade Luxury Gift Tags

There is nothing like a gift given with them little personal touches to show that its bearer has put real thought into it.

I think that gifts should always be wrapped with tender loving care and I therefore like to wrap my Christmas gifts to friends and family in a homemade style.

To do this I simply wrap in pretty tissue paper and tie with beautiful coordinating ribbon, before finishing with my very own handmade gift tags to give it that extra special personalised magic touch.

20121129-013022.jpg

Here’s what you will need to make any of the styles I’ve created for this post.

2 different colour card scrapes) as to create two square embellishments for your tags)

Pic-Tixx 3D Glitter in gold and silver

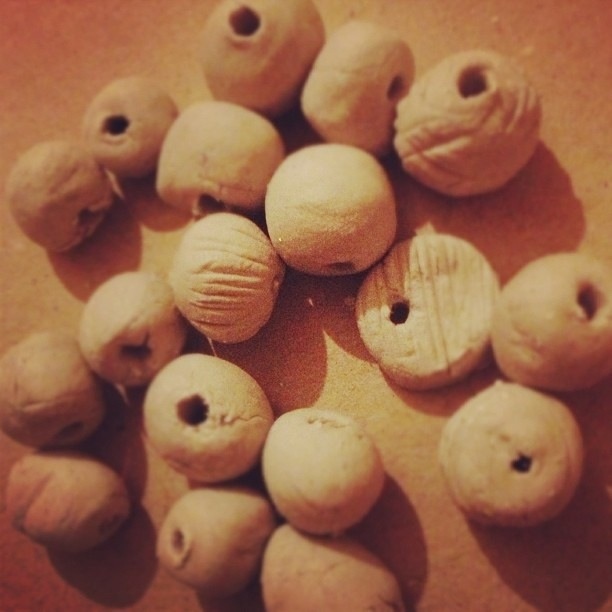
Some small gold bead balls

Selection of ribbon to complement tag colours (I used cream, black, pale blue, orange/gold)

Small length of thin black ribbon (enough to tie into a bow)
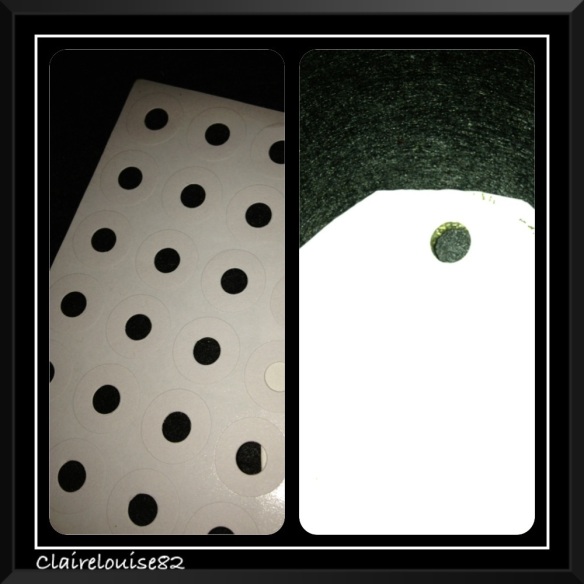
Hole reinforcers

A5 Silver card or another colour of you’re choice (A5 will give you 4 tags per sheet)

Silver card for the tags star unless you wish to use any other colour or patterned card (half of A5 size works fine)

A5 Gold card (or colour of choice)

A5 Shimmery cream card (or colour of choice)

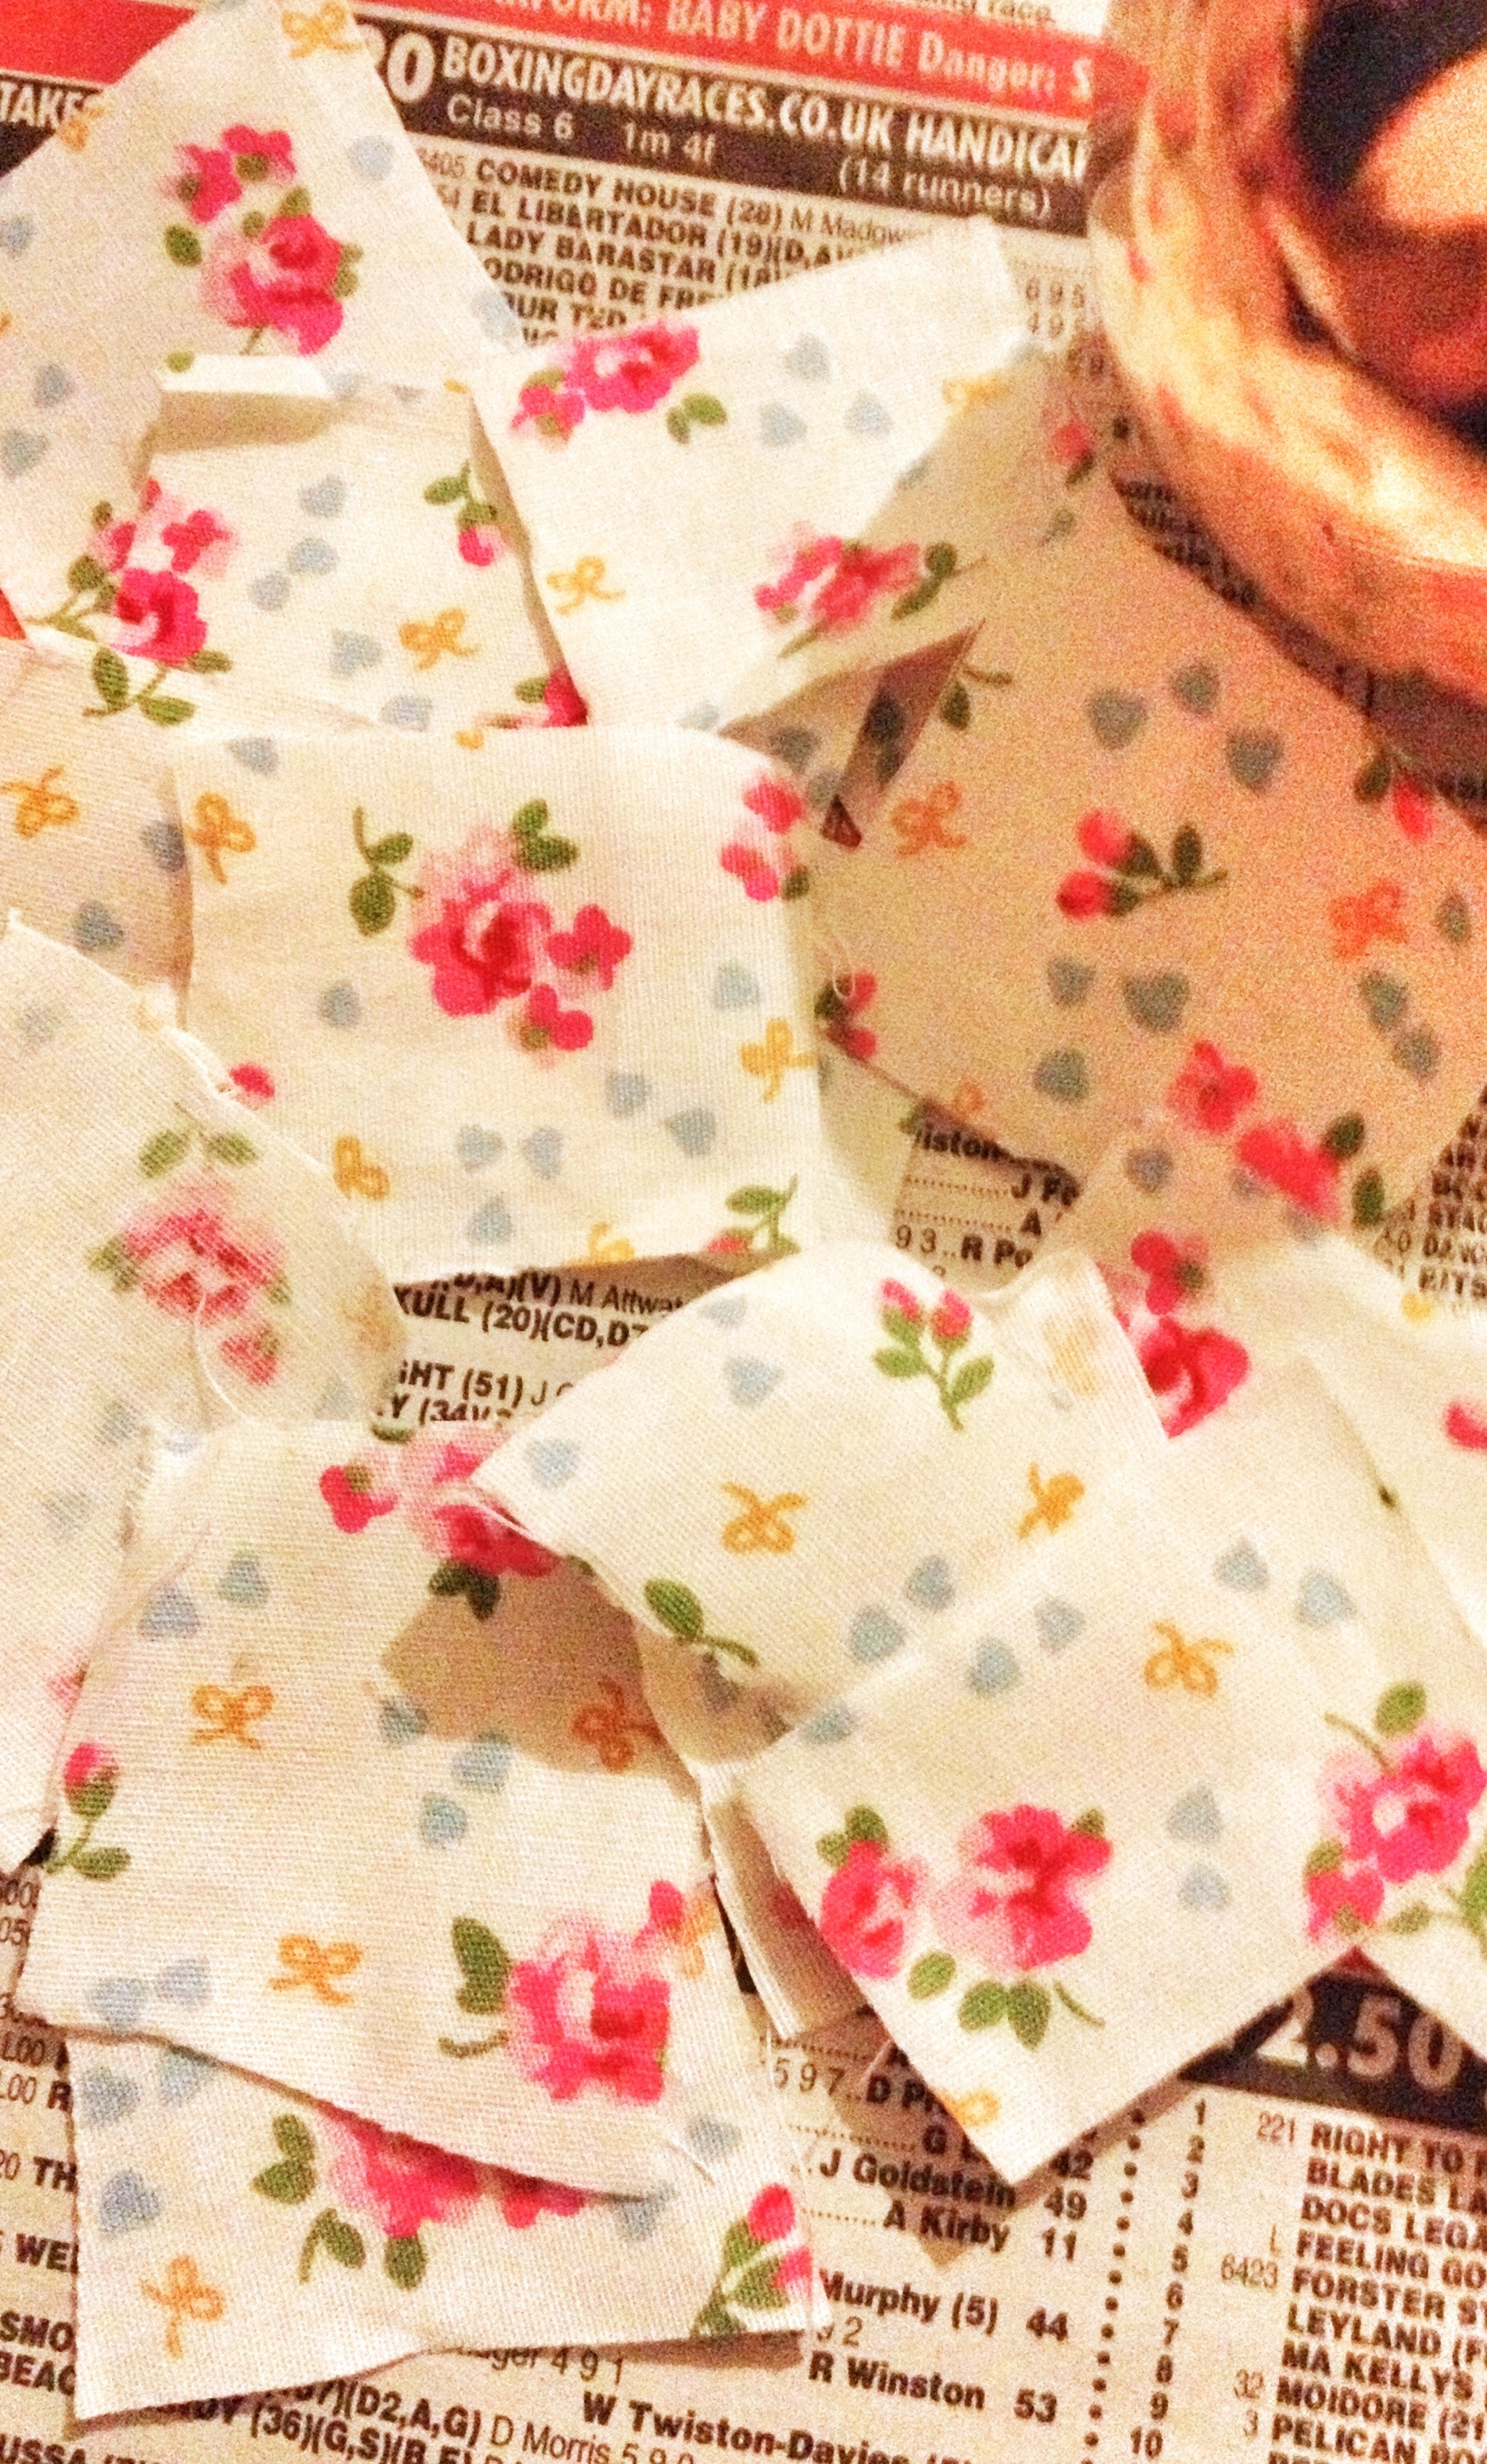
A5 Glittery patterned blue & white card (other colours are fine but be sure the pattern contains that of small flowers or even better, snow flakes)

A5 Glittery leopard print card (for heart tag)

Tag Template (or draw & cut out your own)

Heart template (or you can draw this free hand like myself)

Glue dots

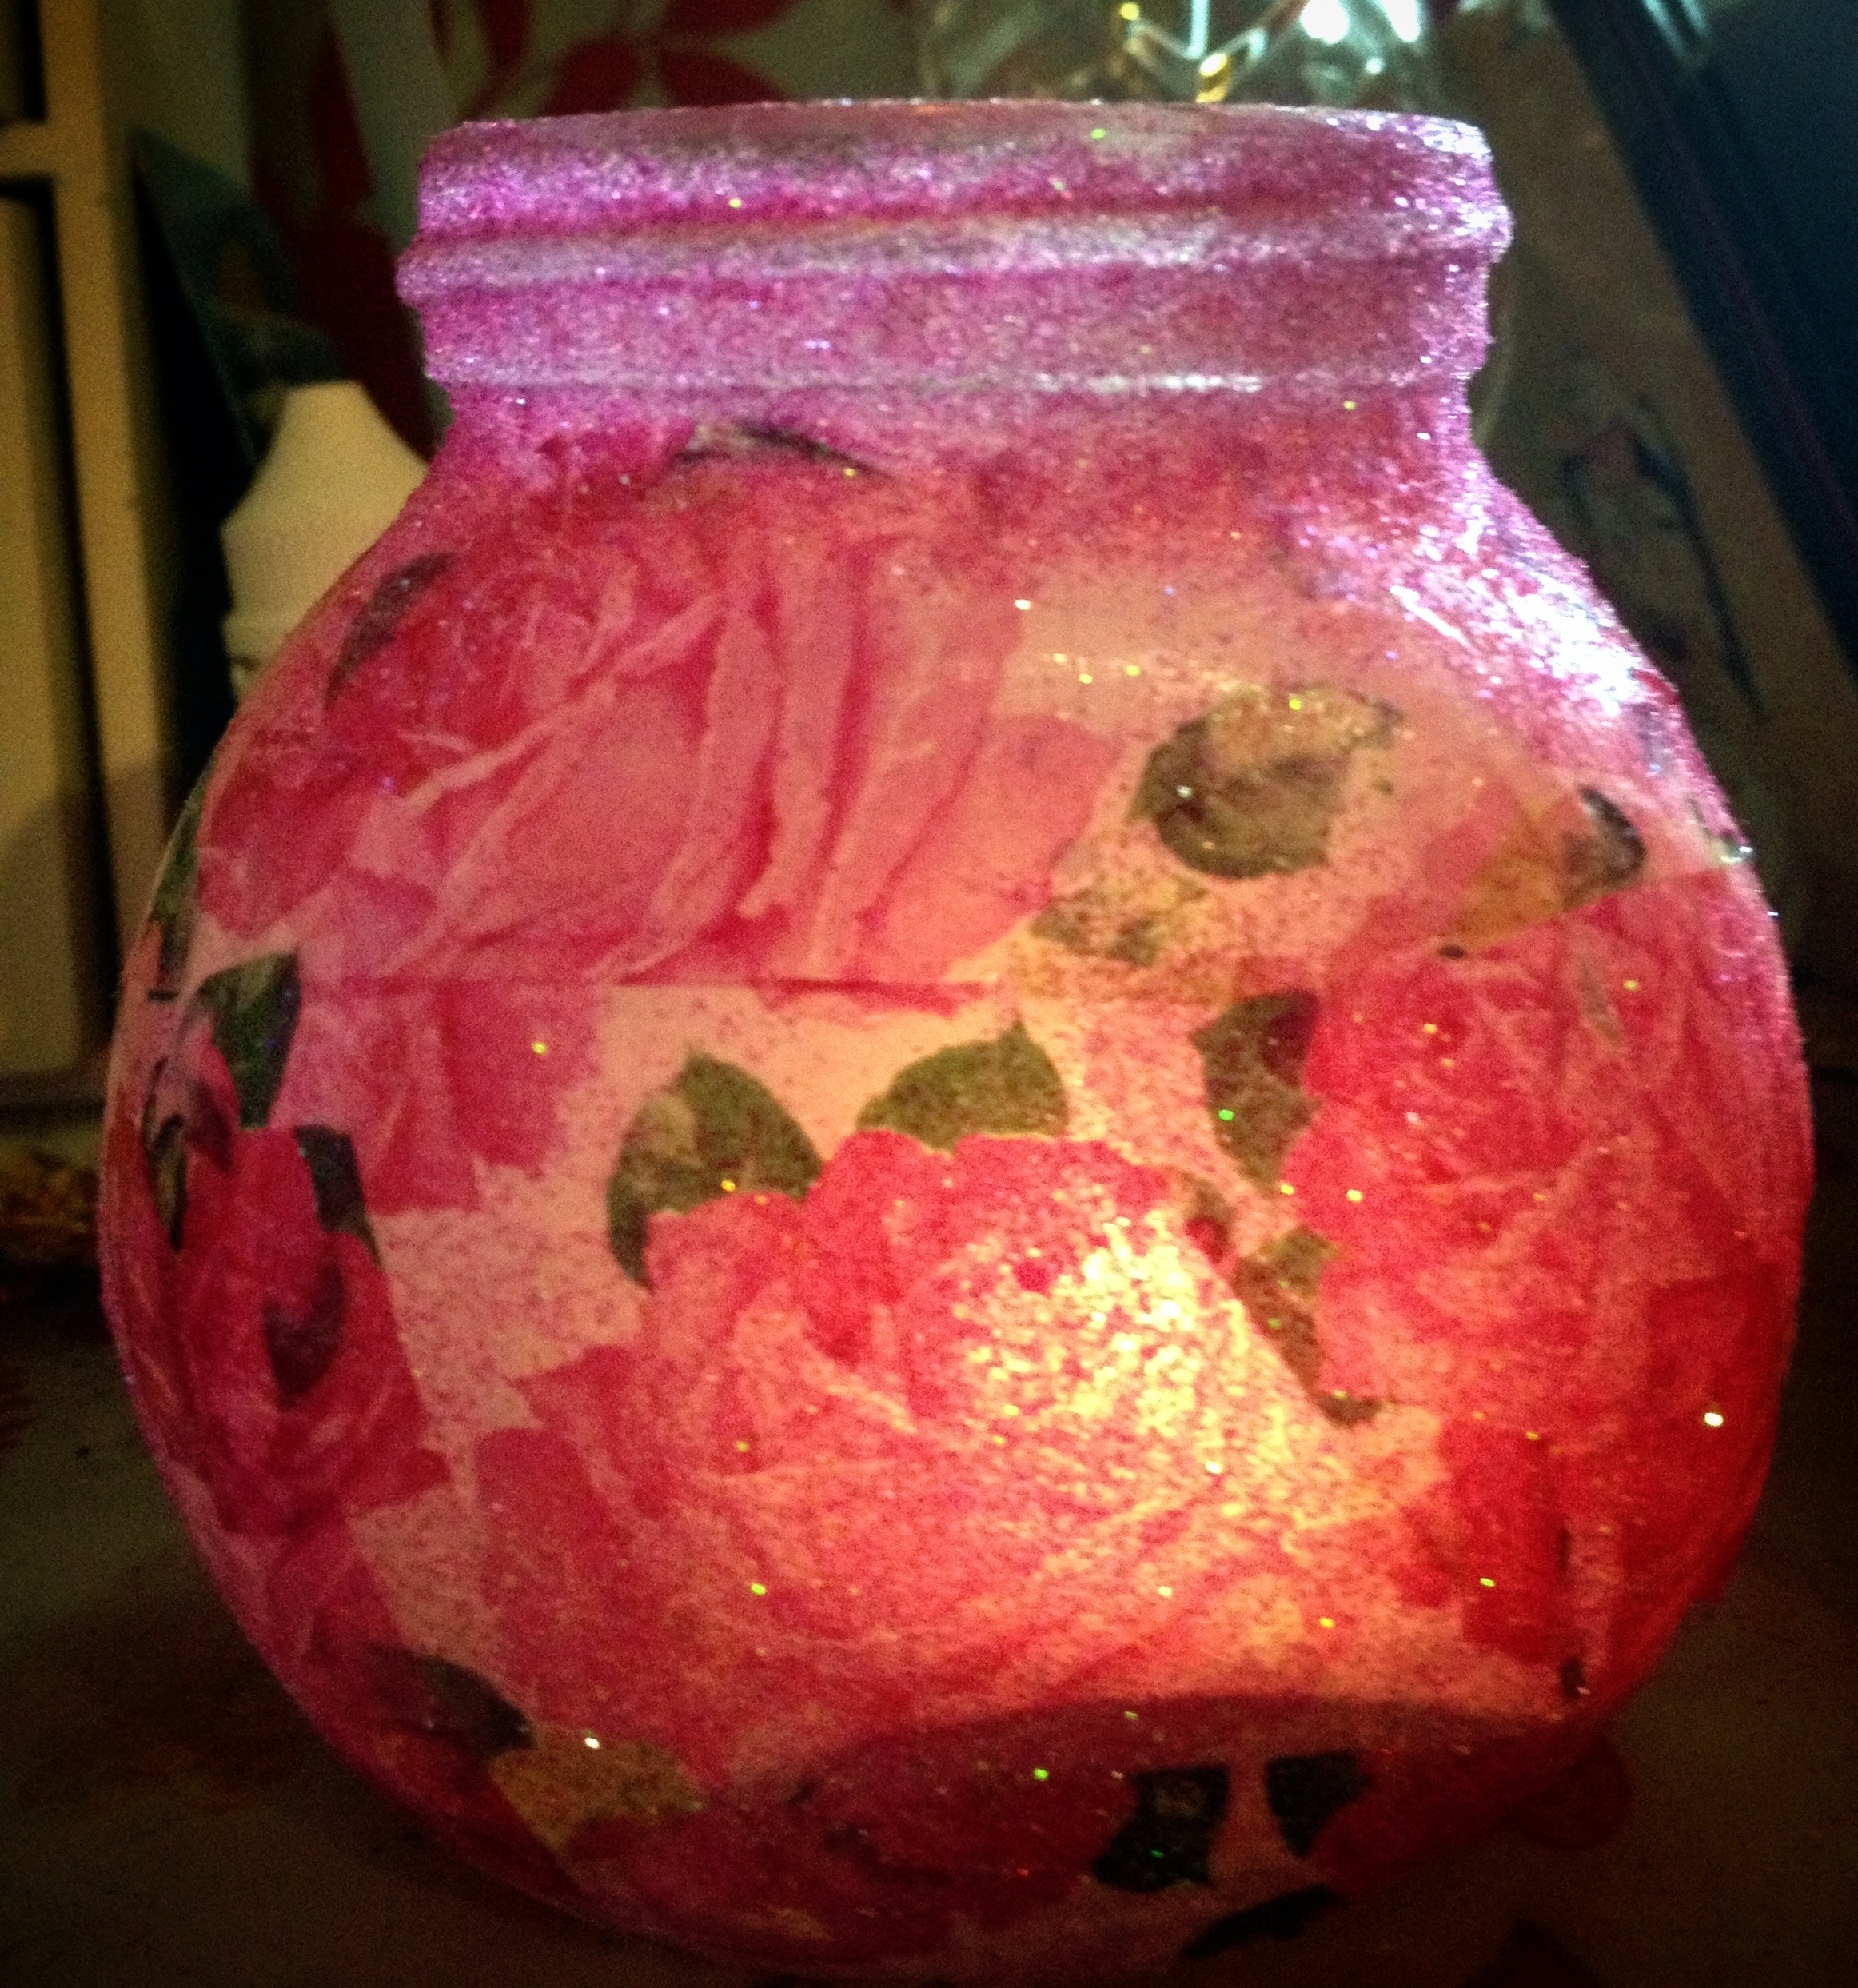
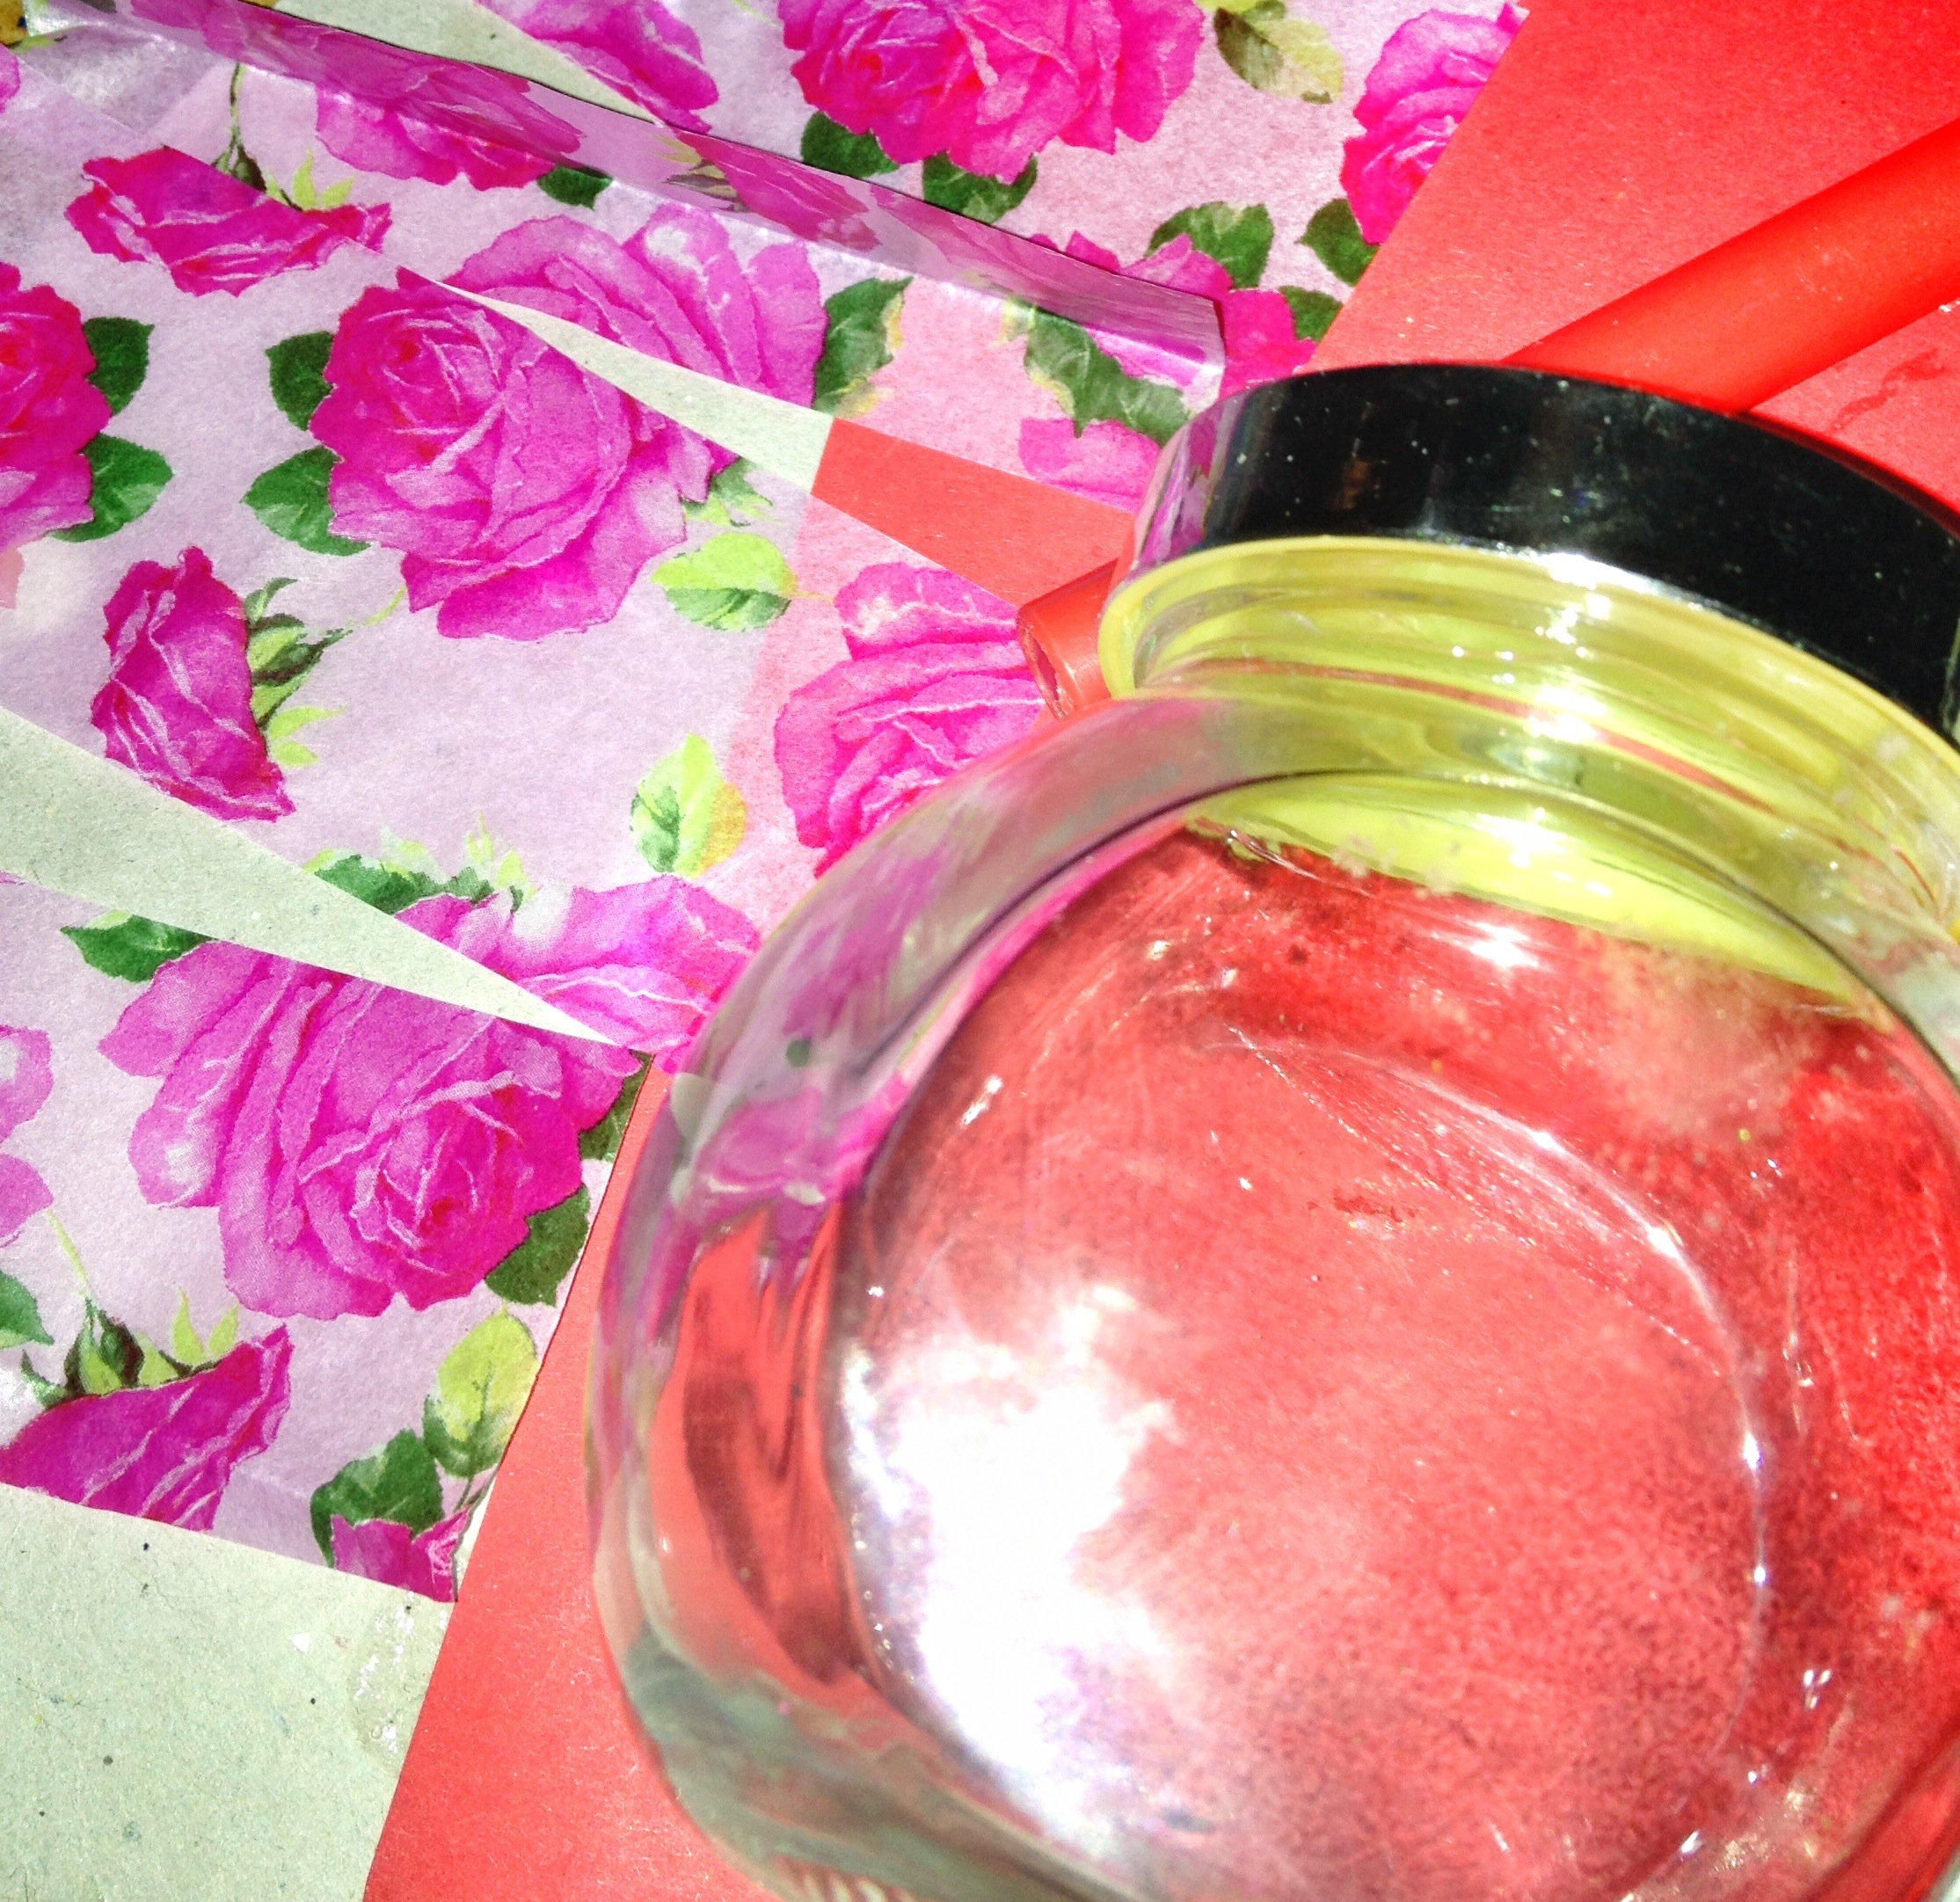
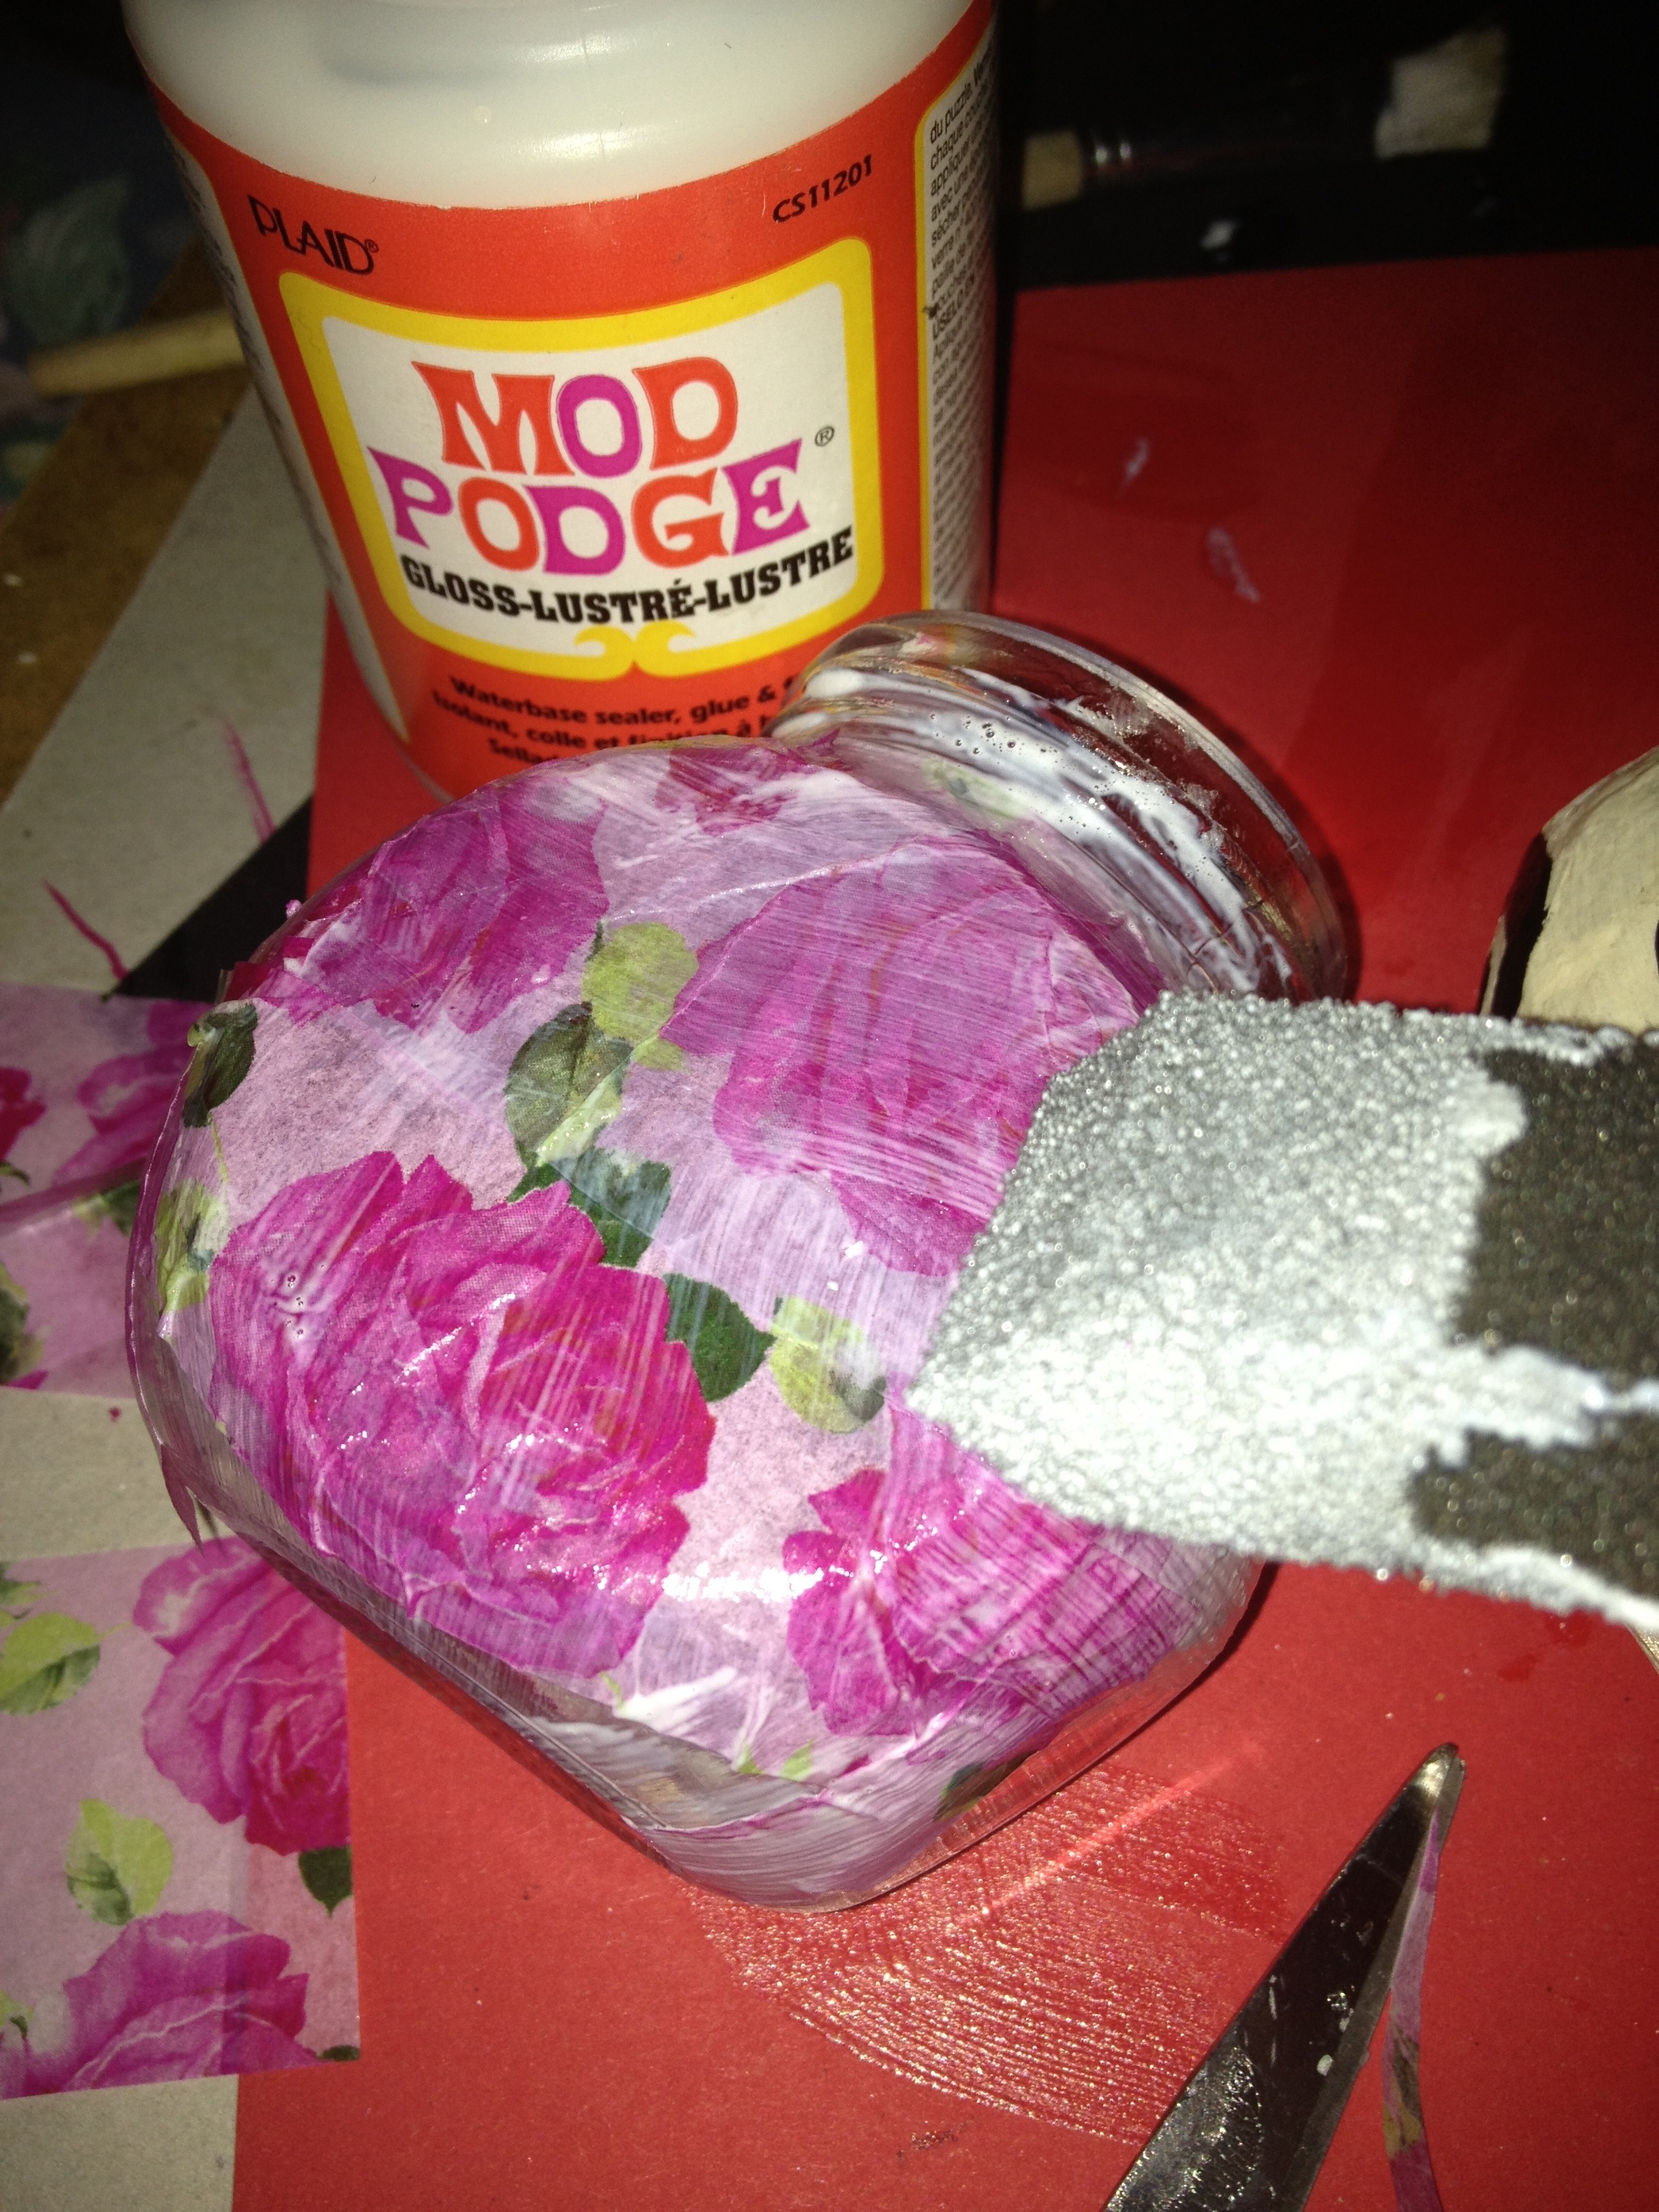
Glossy Decopatch Vanish or Mod Podge

Tools needed

Scissors or precision knife (I use the latter)
Hole punch
Glue Brushes
Pencil
Rubber

Firstly select your card which should be of reasonable good quality in a medium thickness.

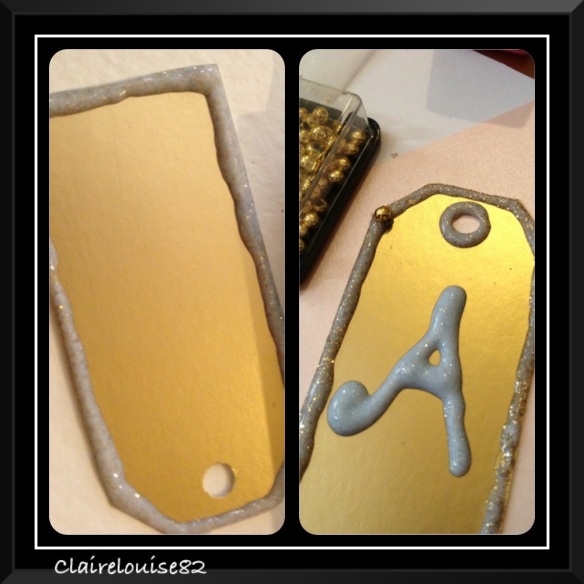
Use your tag template to draw around and transfer to whichever card designs you have opted for. I used gold, silver, shimmery cream and a piece of blue and white glittery patterned card as listed above. Tip… Use a pencil to do this as it allows you to rub out any lines later on. Note, all my card was pain white on one side making it easy to trace the template and later write your message. Lastly don’t forget to make out where the tags hole will need to be.

You will then need your leopard print card or other! On the plain side, draw a heart shape. You can draw around a heart template if you have one or like myself, draw it free hand.

Now using either scissors or a precision knife (which I used) cut out all your gift tags.

20121129-010936.jpg

Once complete, use a hole punch to punch a hole in each of your tags. For your regular shaped tags punch a hole at the top centre of the tag a cm from the edge. As for the heart tag, punch your hole a few cms from the edge on the top right hand side.

Decorate each tag using the different instructions below for each.
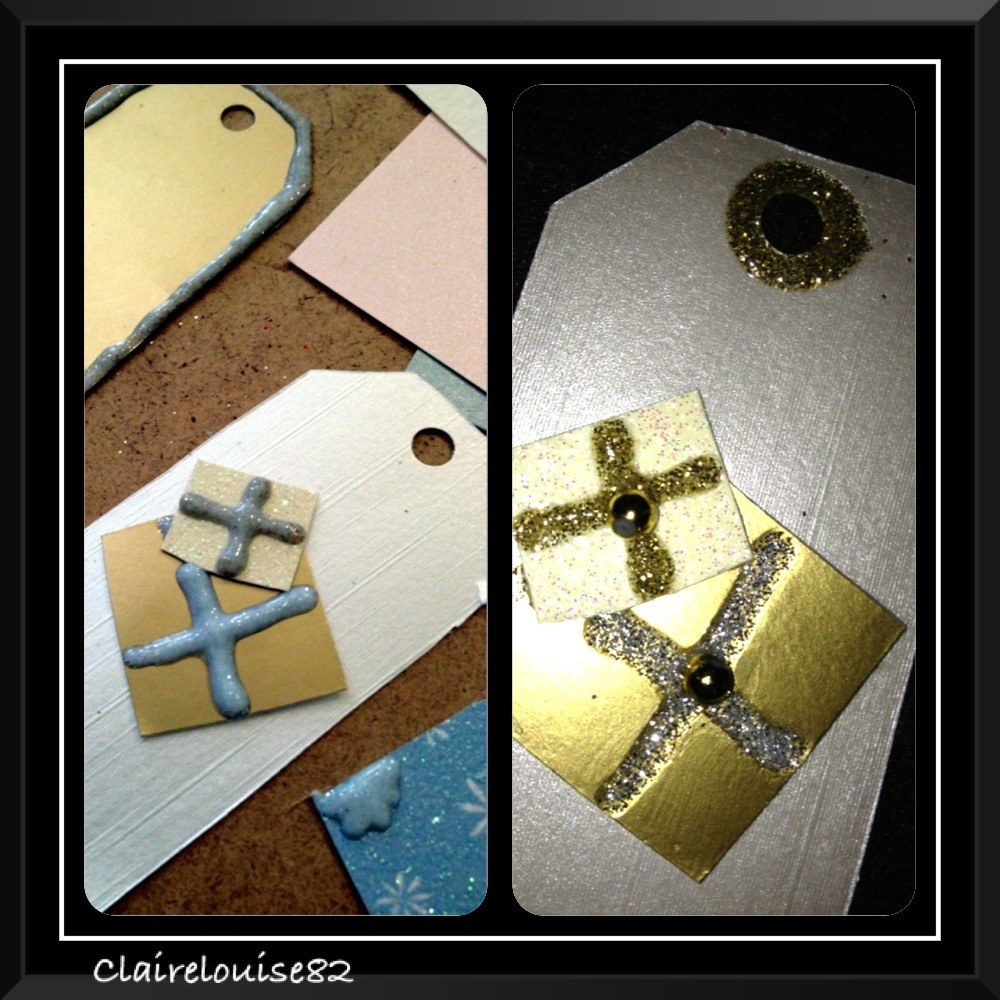
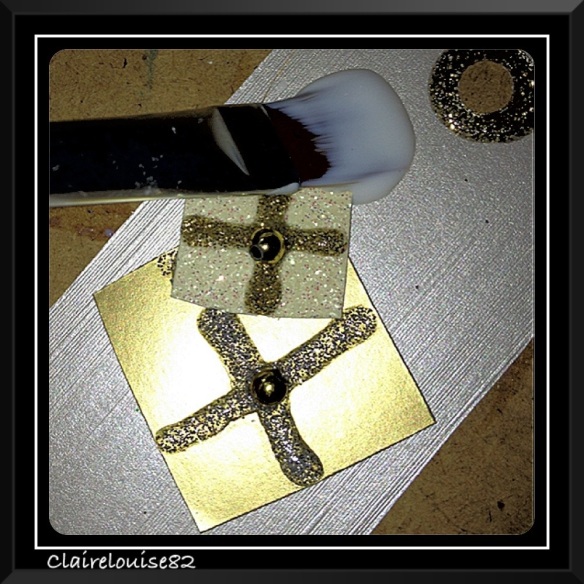
Sliver Tag

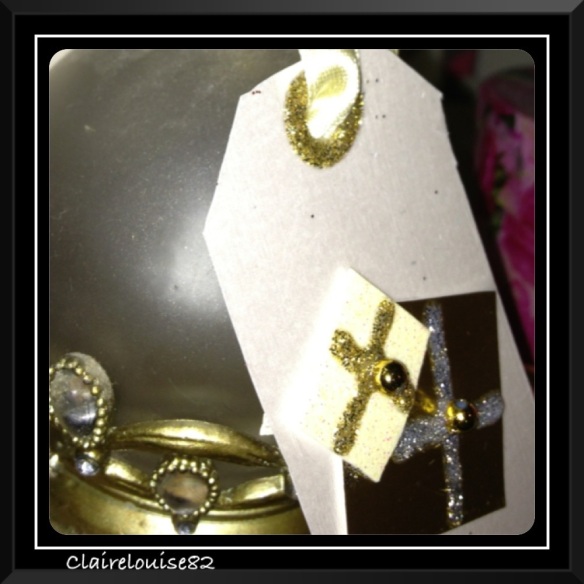
Use two different designs of card to cut out the shape of one small and one big square. Be sure to ensure these are no wider than your tag. See the silver tag below for a visual idea on required size.

Use glue dots to Secure the squares to the centre of the tag ensuring they are at a slight angle with the smaller square slightly over lapping the larger squares top left hand corner (see image for further clarification).

Now use gold Pic-Tixx 3D glitter to boarder around the hole of your tag as well as to create a cross on one of your squares. Now use silver Pic-Tixx for the remaining square. This should now resemble two ribbon wrapped gifts.The Pic-Tixx should be shaken and tested first as to make sure it isn’t coming out too watery. If this is the case keep applying pressure to the tube in till it thickens up.

20121129-011029.jpg

Take two tiny gold beads and place in the centre of each square pressing gently into the Pic-Tixx glitter. Now place your tag to one side to dry.
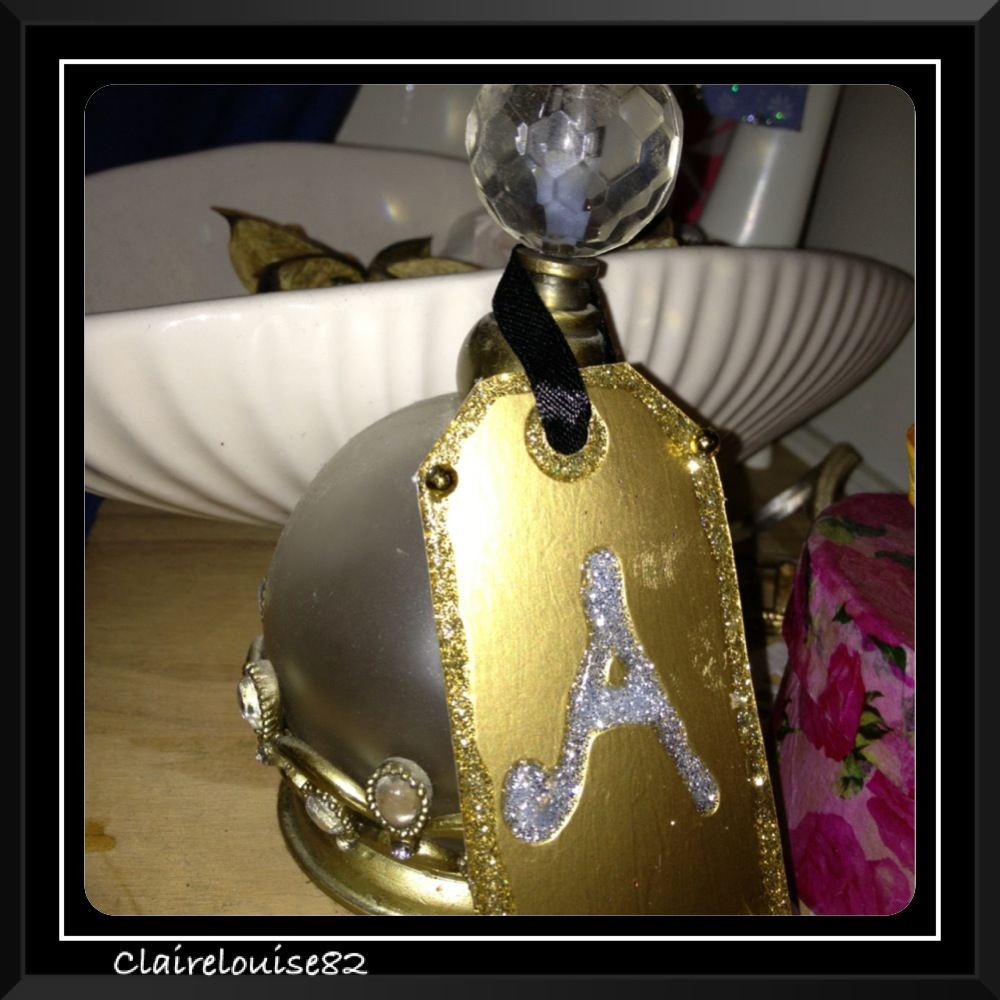
Gold Letter Tag

For the gold tag use gold Pic-Tixx glitter to boarder the tag all the way around its edges. Now boarder the hole like you did for the silver tag. In the centre of your tag write the letter of the gift recipients first name in the Pic-Tixx silver glitter (the Pic-Tixx precision nib makes this simple to achieve).

Use four of the tiny gold beads to decorate the four corners of the tag. The Pic-Tixx glitter boarder will act as the glue needed to hold the beads in place. You can now place your gold tag to one side to dry.

20121129-011126.jpg

Blue & white Glitter Tag

For this tag you should have selected any patterned card featuring small flowers or better still snow flakes.

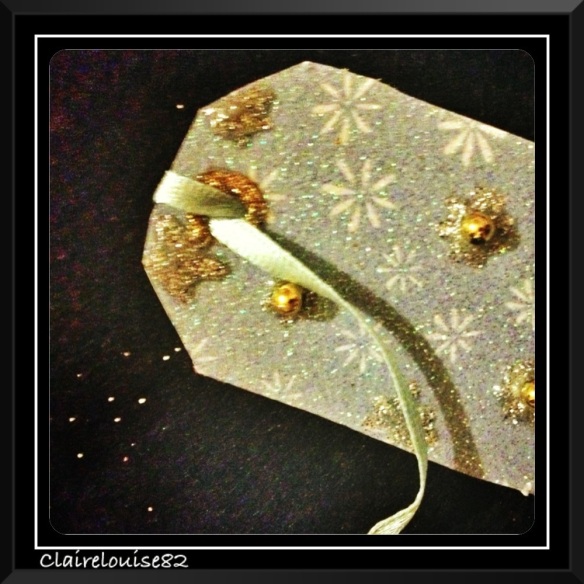
Use the silver Pic-Tixx glitter to randomly draw around some of the flowers or snow flakes (see pic for clarification).

Now use the gold Pic-Tixx to boarder your tags hole (as you have done for previous tags).

Now take some of the gold beads and place them in the centre of the glittered Pic-Tixx flowers or snowflakes. If any of your Pic-Tixx flowers or snow flakes are located at the edge of your tag only exposing small areas of the design then reframe from adding beads. As you can see I just added three beads to the pattern in the tags centre.

20121129-011224.jpg

Now place with your other tags to dry.
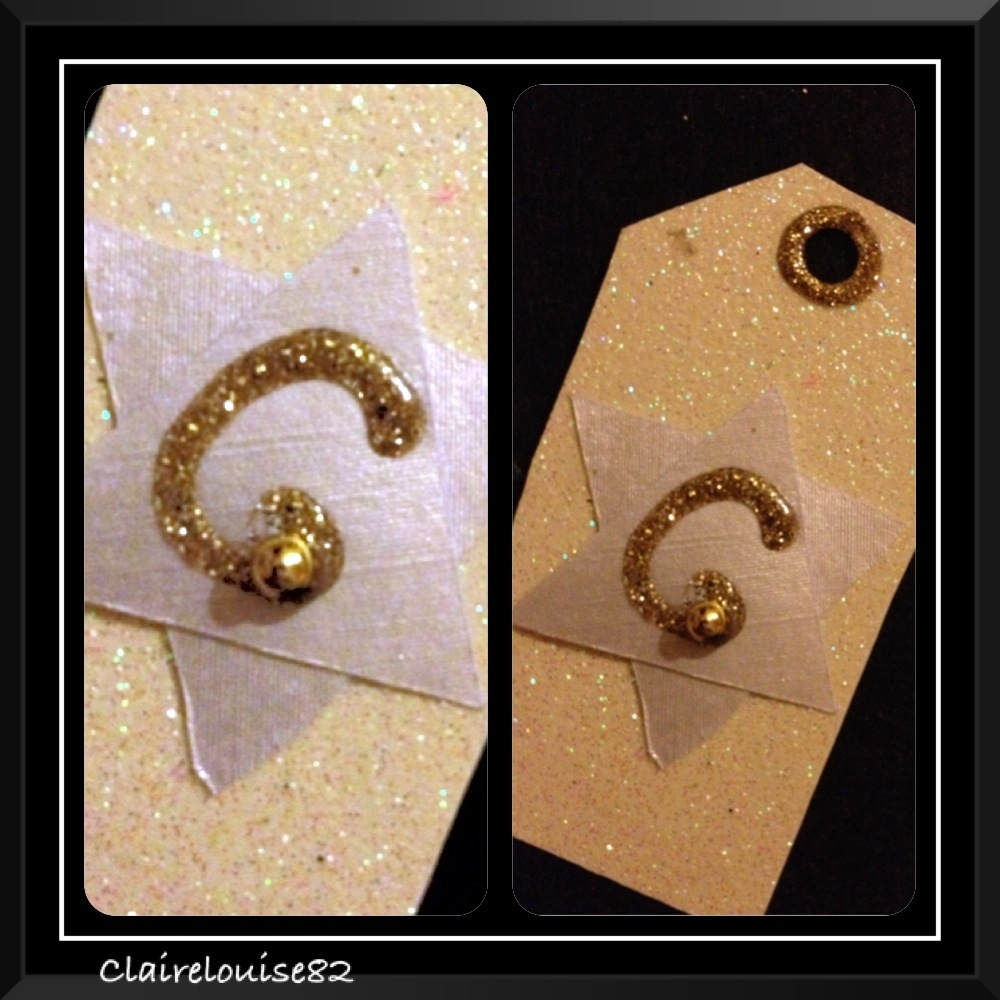
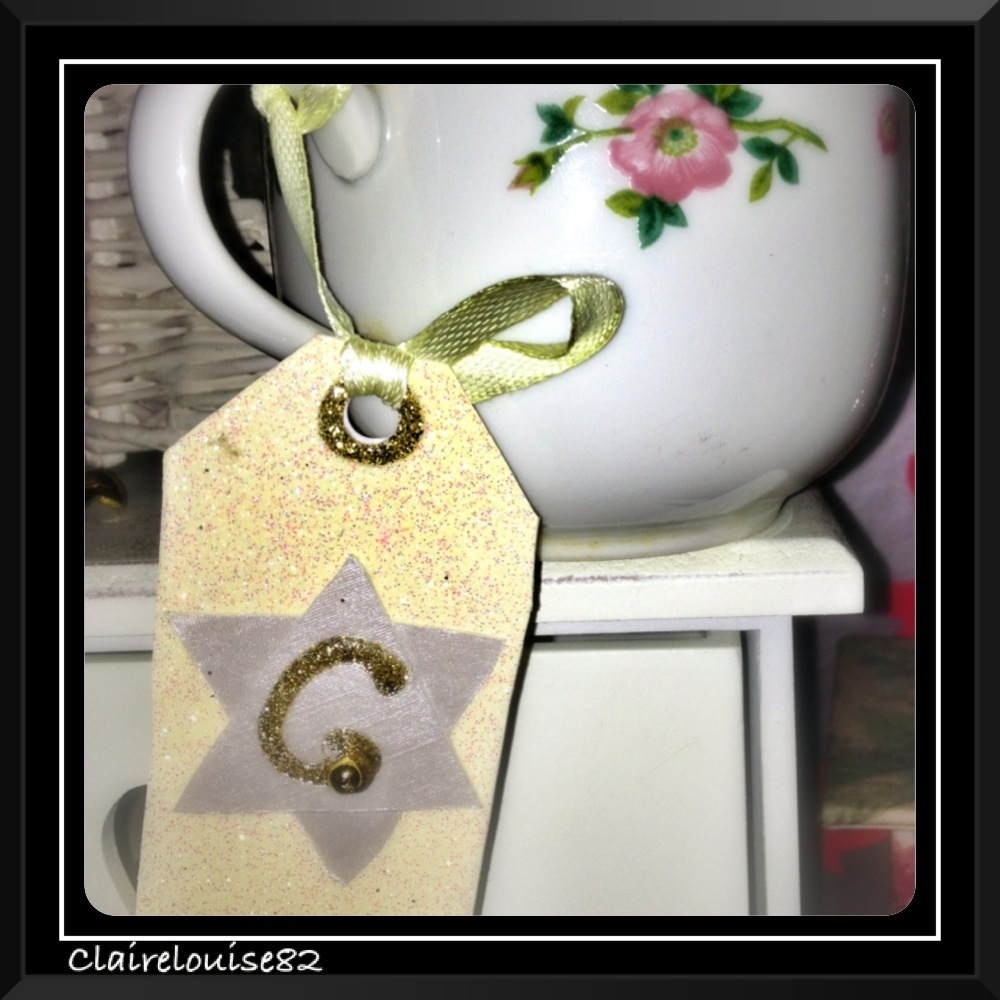
Shimmery Cream Tag

Cut two similar sized triangles from your silver card, ensuring they are no larger or wider than your tag (see image of mine for visual instructions).

With glue dots secure the triangles to the centre of the tag as to create the symbol of a star (one triangle is placed upside down on top of the other to create this effect).

Use the gold Pic-Tix Glitter to write the the first letter of your gift recipients name In the centre of your star and again boarder your tags hole.

Place one gold bead at one of the letters edges allowing the Pic-Tixx to secure it in place.

20121129-011338.jpg

Place your tag with the others to allow to dry.

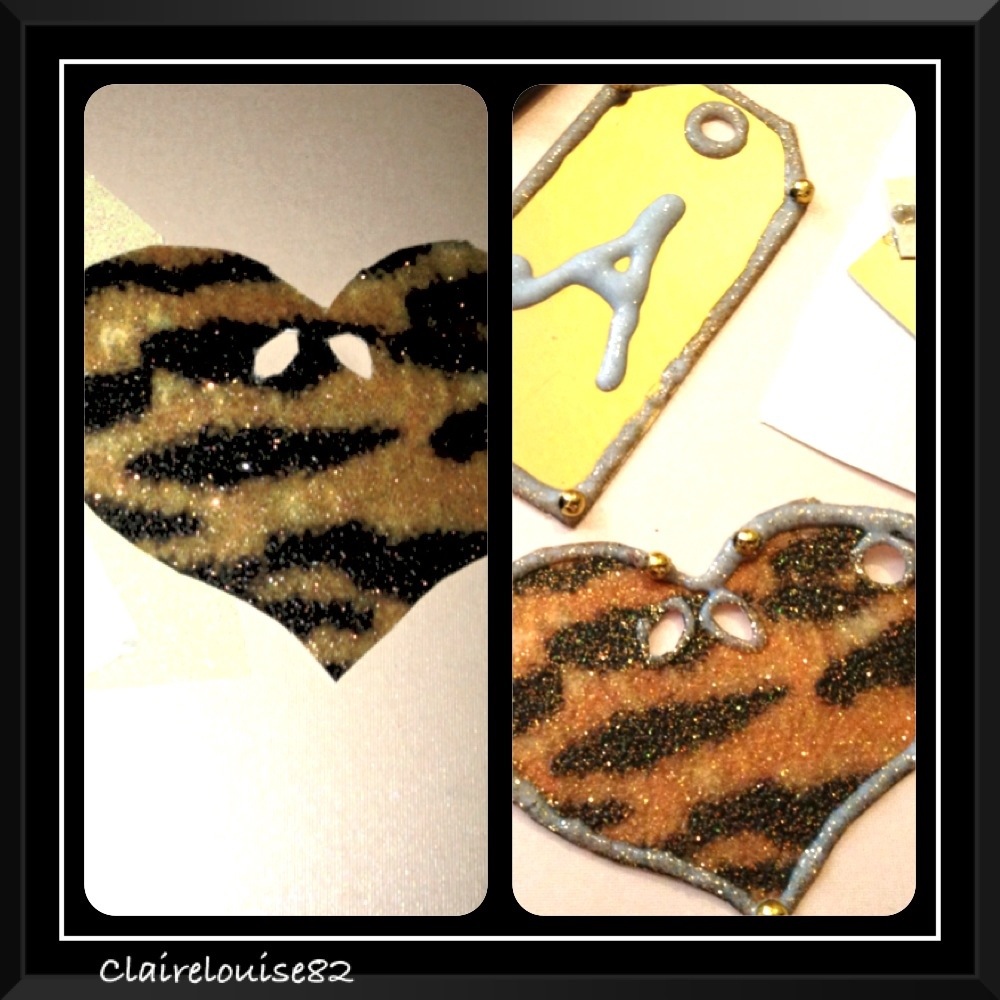
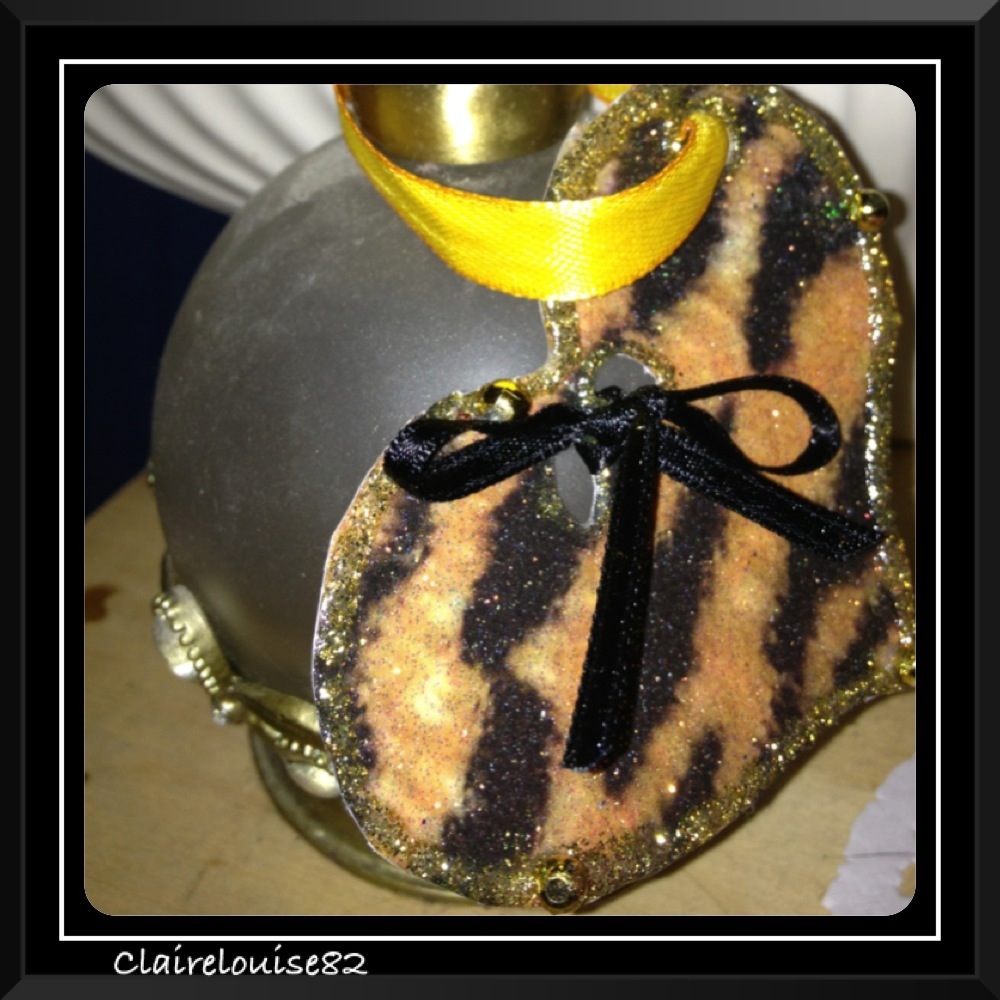
Leopard Print Heart Tag

Bring forward your leopard print heart tag and with a precision knife with a small tip cut out two tiny oval shapes at the centre top of tag (see precise location in the image of this tag)

Once you have taken the above step, use the gold Pic-Tixx glitter to boarder the tags edges and that of the oval shaped cut outs and tags hole.

Now randomly add the tiny gold beads around the tags boarder (see image)

20121129-011431.jpg

Lastly, place your tag with all the other decorated tags and allow to dry.

Tags will normally be fully dry in around 3 hours, in some cases quicker depending on the drying location. Mine took around an hour but I left a little longer as to be sure.

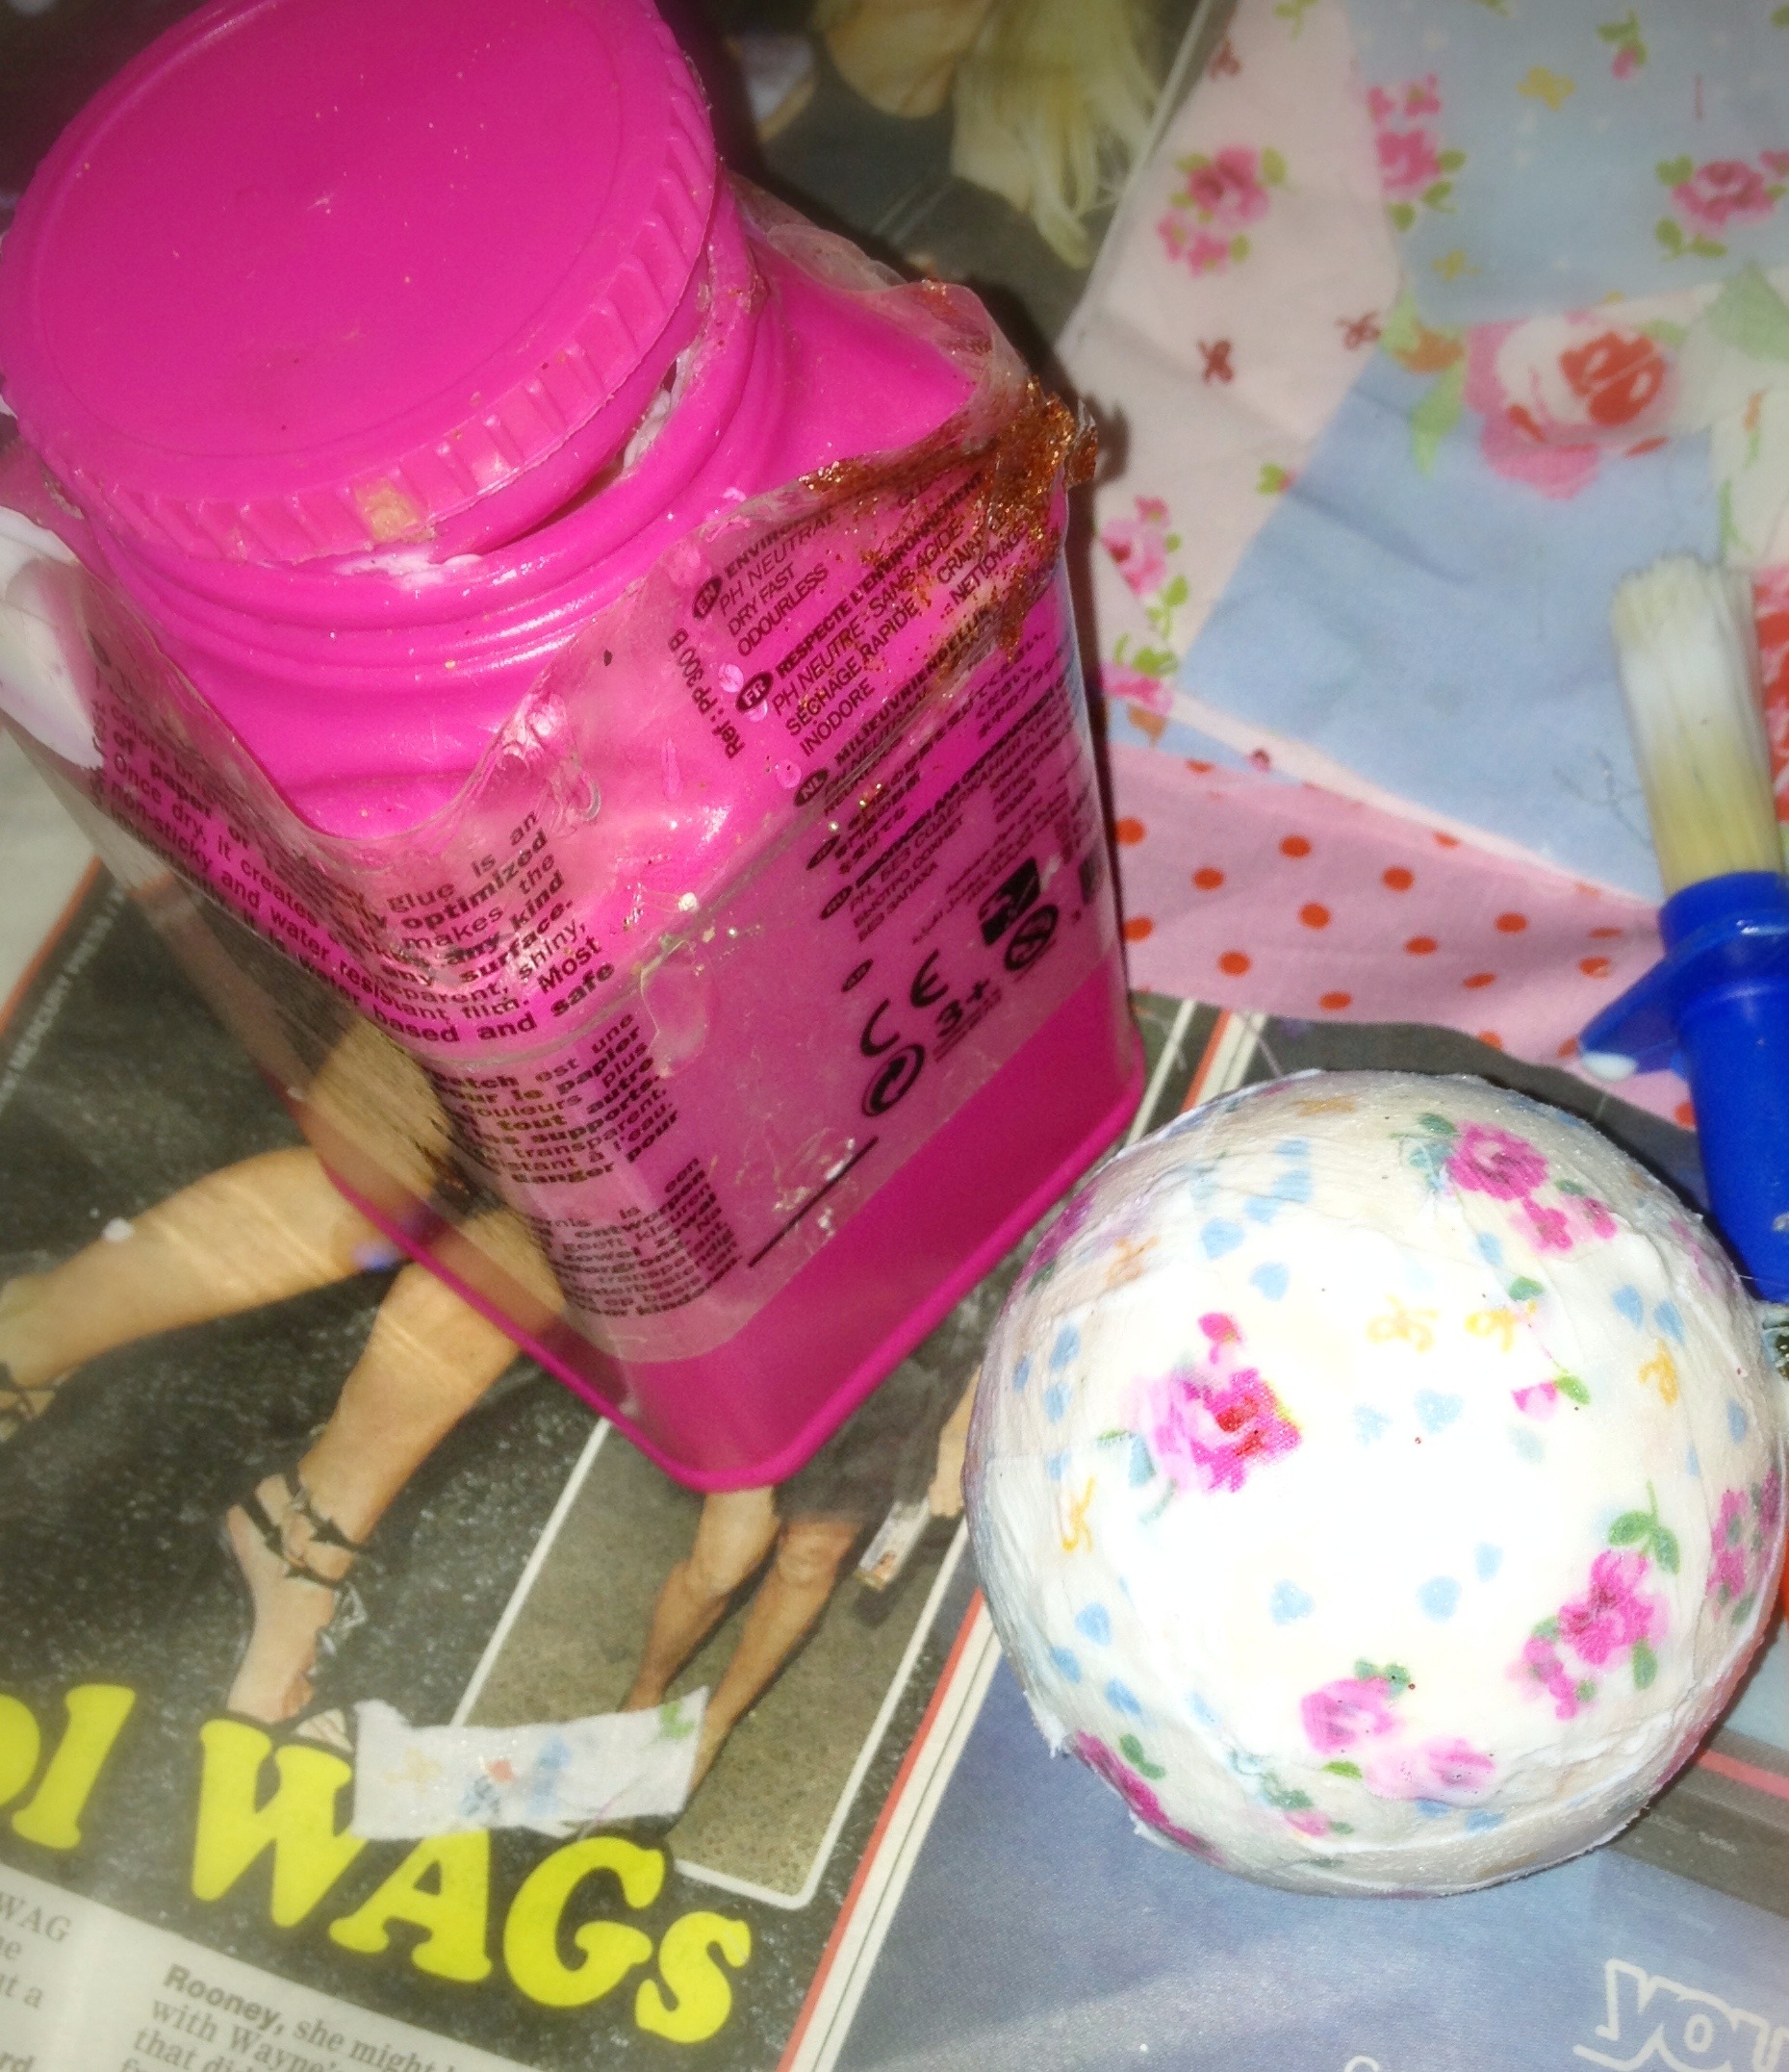
Once all tags are dry cover the designs in Decopatch glossy glue or shimmery Mod Podge. If using using Decopatch Glue add some ultra fine silver glitter dust (just a pinch). Glue will dry clear giving the tags a professional and durable finish.

20121129-013817.jpg

Again tags can take anything from an hour to three hours to dry. You will know when the process is complete as the tags will look shiny and the glue would have dried clear. I like to do this part before bed so I know my tags will be fully dried by morning.

Now add hole reinforcers to the back of your tags hole to ensure its extra strong.
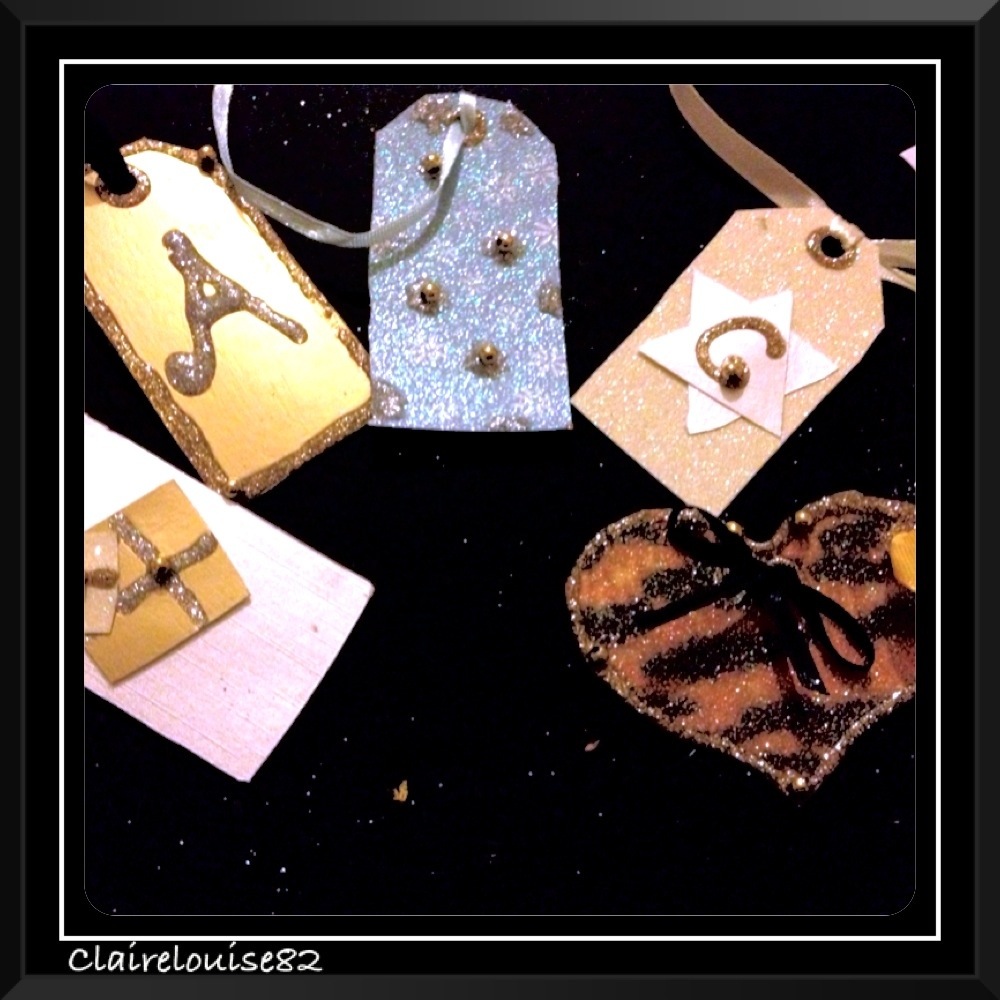
20121129-013645.jpg

Finishing touches

Use the thin black ribbon to thread through the two oval cutouts on the leopard print heart tag. Then to finish tie the tread into a bow cutting off any excess.

20121129-011647.jpg

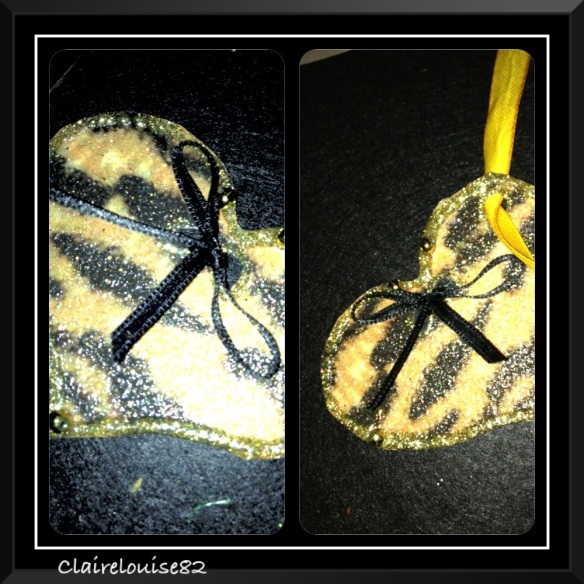
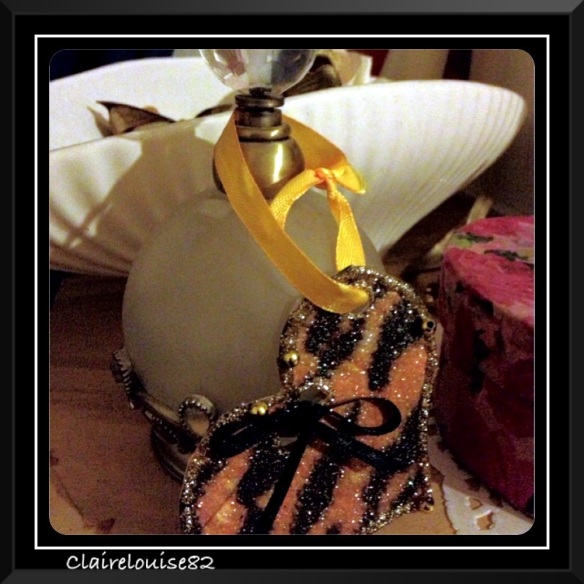
Now thread your chosen ribbon through the hole of all your tags. You can make a loop by securing ribbon to the back of the card or leave ribbon hanging so it can be attached, allowing tag to dangle from gift.

20121129-012552.jpg

20121129-011559.jpg

Messages written on gift tags look extra special when they have been wrote in glittery or metallic gel pens.

20121129-011830.jpg

20121129-012208.jpg

20121129-012234.jpg

20121129-012255.jpg

Would love to help about everyone else’s festive craft ideas, so feel free to share.

Reference

Pic-Tixx – Baker Ross Ltd
Card – eBay
Tiny Gold Beads – HobbyCraft
Ribbon – Baker Ross Ltd