
#silentsunday
Image
1

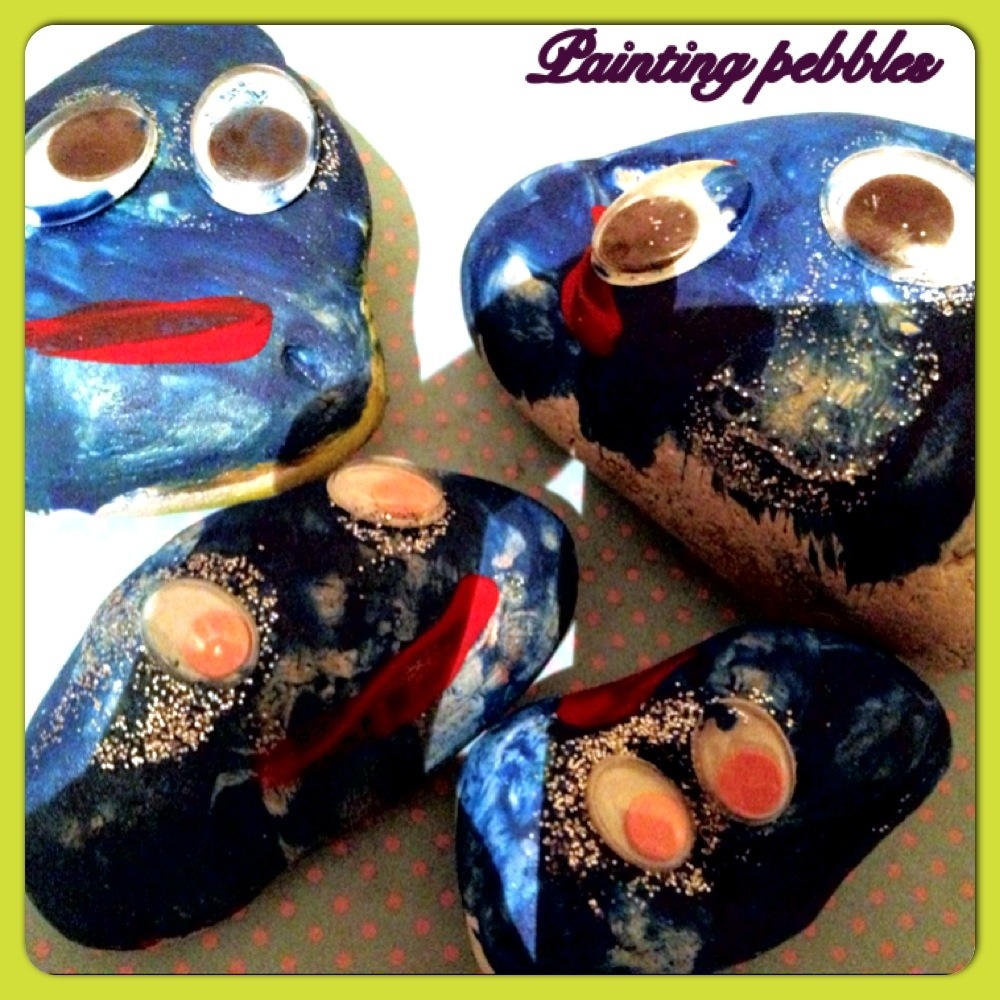
We, meaning myself and the kids, collected lots of pebbles while on our recent trip to the seaside. Once we got them home we decided we would paint them for the garden.
Our pebbles would be used to brighten up flowerpots and flower beds. Here’s what we used…
Various Pebbles (collected from the beach)
Acrylic paints (various colours)
Mod Podge
Googly Eyes
Glitter glue
You can paint your pebbles anyhow you like the possibilities are endless. This is a great little craft project that you can do with the kids. My very own toddler loved it.
The activity held my creative little three year olds attention for over an hour. He painted in various colours before adding different coloured googly eyes and painting on red smiles.

His little stones were painted and glittered… Messy but fun.
Once the toddlers pebbles were dry I added a layer of Mod Podge to give them a shine as well as a protective layer.
Yourself, along with the kids, can let the imagination run wild painting & creating allsorts of designs and patterns from funny faces to dinosaurs, dots to hearts.
We also made some pebble bugs using paint and googly eyes. For our bees and lady birds we used some foam pieces to form the wings. For our spider we used some garden wire for the legs. These are currently busy drying on the window pane, but I’ll be sure to post another little update once they are dry and ready to display.
As for Harley’s wacky face pebbles, we plan to place them around the flower beds in our garden today (given it remains bright and sunny that is).

Hope we have inspired you to have fun with paints.
Remember… Painting on paper is fun but painting on pebbles is awesome!


Here’s a very easy craft project to do with the kids this weekend.
Given its been kinda wet outside these past few days spring doesn’t really feel like its in the air. So, why not bring spring indoors with this cute spring bouquet made with tissue paper flowers.
These are easy to do yet an enjoyable activity for children both big and small.
Bouquets can be decorated anyway your child desires whether it be simply dotty flower wrapping or crystals and bows.
To make these with your children, here’s what you are going to need to make it happen.
3x Sheets Of Tissue Paper (3 different colours)
Mod Podge (or PVA/water mix)
Ribbon
3x Strong Glue Dots
3x Tiny Faux Pearls (for smaller flowers)
3x Big Faux Pearls (for larger flowers)
Decorations (examples… Embellishments, beads, glitter..)
1x Elastic Band
1x Sheet Of Green Tissue Paper (optional – if leaf shoots are desired)
Here’s what to do…
First take two sheets of tissue paper in 2 of your 3 colours and rip them into strips (you want around 6 strips, 3 in each of the 2 colours).
Now one at a time roll your paper strips ( ensure that 3 of the strips are rolled more tightly than the other 3). Now pinch 1/4 of the way down and twist to form a bud and stem.
Fiddle with the paper buds to form the flowers shape. At this point you can slightly open the buds and fluff them out a little on the not so tightly rolled flowers. For the 3 tighter flowers be sure to twist and pinch a little firmer to keep them closed like rose buds. Remember, for this tutorial we are making 3 rose buds and 3 open roses.
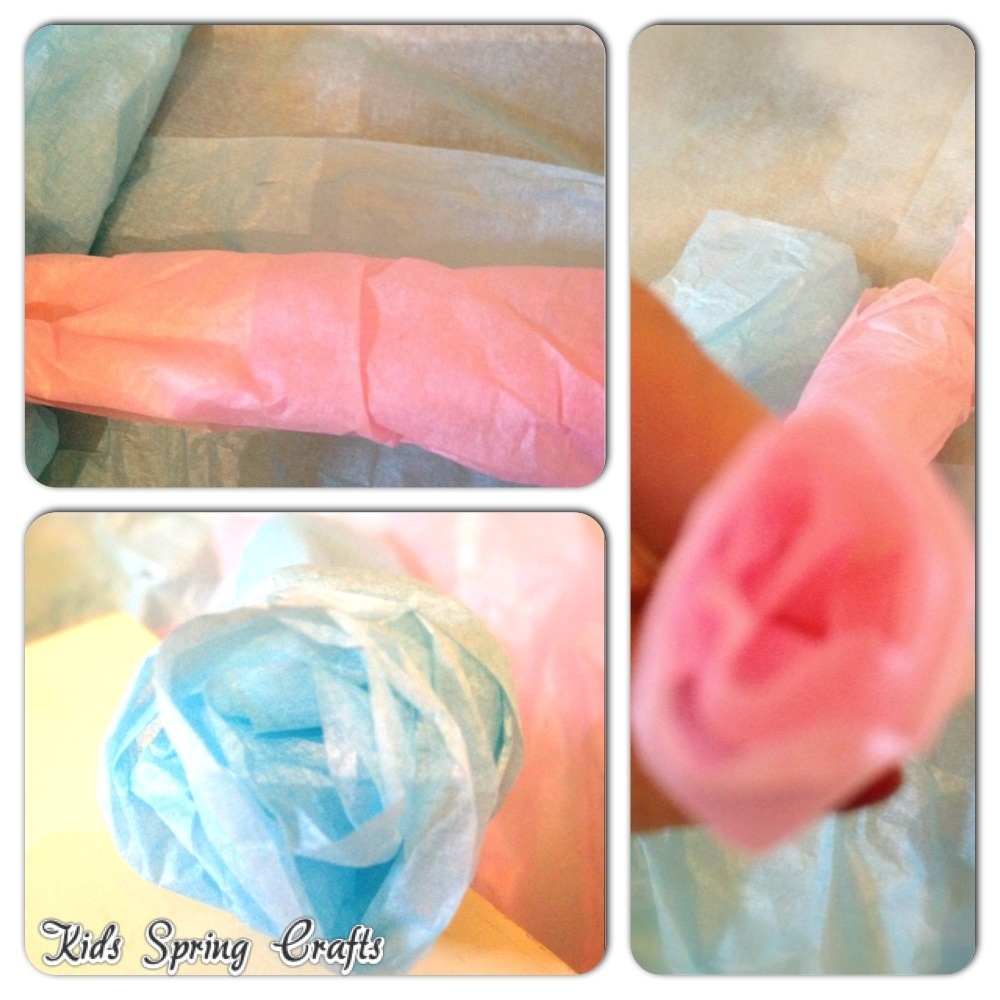
Now, cut of some of the stems away to make the flower smaller. At this point no glue is required as the twisted paper will hold itself.
Once you have done this step for all your tissue paper strips bunch them together and secure with an elastic band.

Now bring forward your remaining sheet of tissue paper, fold in half and half again and lay down at an angle like that of the image below.
Place the bunched flowers at a tilted angle so that the buds are directly beneath the top right corner like so.
Wrap your flowers in the paper forming a cone like shape, squeezing the bottom tightly and securing around the middle with pretty ribbon.

Push the 3 small faux pearls into the 3 rose buds.
For the larger open roses, add an extra strong glue dot to the bottoms of the 3 large pearls and again push into the centre of the flower.

Now add a very thin layer of Mod Podge or PVA/Water mix (though this will require many more hours to dry).
If using mod podge leave to dry for around 40 minutes (more or less dependent on the conditions your working in.) If using PVA/Water mix this could take anything from 6-24 hours to dry.

Use your decorations to glam up your bouquet. We just added a sequinned pink heart to our flowers wrapping for a pretty finishing touch. If using gems and glitter apply another coat of glue mix or mod podge to ensure all decorations are set. We just added our heart so nothing more was required.

You can let the kids go crazy making these. They could really mix up the colour combinations or even roll one colour tissue paper inside of another to give that pretty two tone effect.
Experiment with the wrapping of your flowers, maybe wrapping them in pretty cellophane or felt. Another pretty idea which can be done for winter as opposed to spring, is to add white ultra fine glitter dust around the edging of each flower for an iced, snow effect.
If like us you want some green in with your roses, then why not add some shoots of grass to your bouquet which are easy enough to achieve and requires nothing more than a sheet of green tissue paper.
Here’s how its done.
1… Simply roll the green tissue paper tightly
2… Pinch and twist a 1/4 of the way down
3… Twist tightly the remaining paper making a stem and cut in half (discard of bottom half)
4… Tie off at the end and then snip the flat end (top) to resemble grass.
5… Fit into your bouquet where desired.

Don’t they look lovely?

Hope you’re now feeling inspired and the kids are too.

When on holiday recently we visited the local beach which was made up off shingles and pebbles as opposed to sand. With so many on offer, I decided I’d take some home for crafting purposes. We collected all different types of pebble and had great fun doing so. We ended up with a huge bucket full consisting of all kinds of shapes sizes and textures.

So just what am I planning to do with all these pebbles. Well, some of the pebbles will be painted in various designs by myself and the toddler. These will then be lovingly placed around the garden, in pots and plant beds. The rest I’m planning to decorate using inspiring word art. These decorative pebbles can be placed around the home or given as gifts. Its the latter I’m going to share with you all today.
What you’ll need…
Pebbles (various sizes, smooth and flat)
Decopatch Glossy Glue
Black permanent marker
What you need to do…
Firstly wash your pebbles well removing any dirt or other bits of the beach you brought back with them. Once washed dry thoroughly.
Now use a brush to cover all pebbles in 2 thin layers of Decopatch glue.
Leave for 20-30 minutes
Next take your black permanent maker and dependent on the particular size of your pebble write an inspiring word. Go over the ink once dried making sure the wording is really bold.

If you’re feeling adventurous, while not add a little symbol by your inspiring word to your pebble a bigger lift.

Important… Use the Decopatch glue before you write on the stone as no matter how long you’ve dried the stone with your wording, Decopatch glue will lift the ink and smudge your design.
Leave lnk to dry and then display.
Here’s some words I added to our pebbles…

Hope you’re feeling inspired.
Remember: When you’re next visiting a beach, always bring some of the beach home with you for crafting!
Happy Easter Everyone
Here’s how to make yourselves or your children some rather cute bunny ears.

You’ll need
1 Alice Band
9 Pink Pipe Cleaners
4 Purple Pipe Cleaners
1 Sheet Pink Felt
1 Sheet White Felt
Piece of Self Adhesive foam
Ok… First…

Then…


And Finally… Pop them on your head and look super cute.

Enjoy. X
I love Easter, Spring is in the air and Daffodils can be seen sprouting from the ground beside that of the Bluebells. Its the day you’re technically allowed to scoff our faces with chocolate and not feel so guilty about doing so!
However, lets be honest, it isn’t the healthiest tradition is it? And as a woman, I always beat myself up a little following the Easter Binge. Nonetheless, there are many other cute gift ideas that can be given at Easter, ones that don’t actually involve any chocolate at all! Whats more, you can actually craft many of these gifts yourselves making them that bit more personalised and special.
I made a cute Easter basket that I filled with decorated eggs and then shared here on the blog last year.
Today I’m creating an Easter basket of a different kind! One a bit different from the norm. I guess you could call it a bag, though its Easter themed all the same.
So here it is!
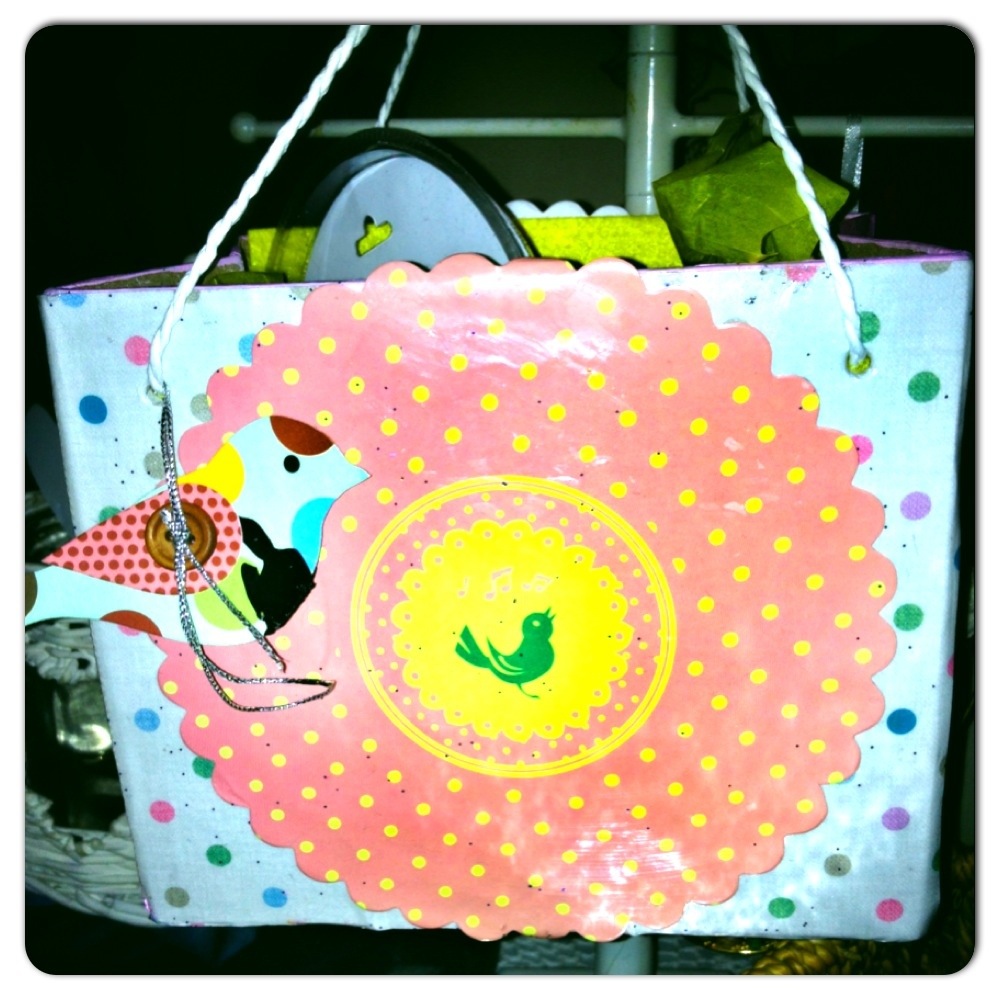
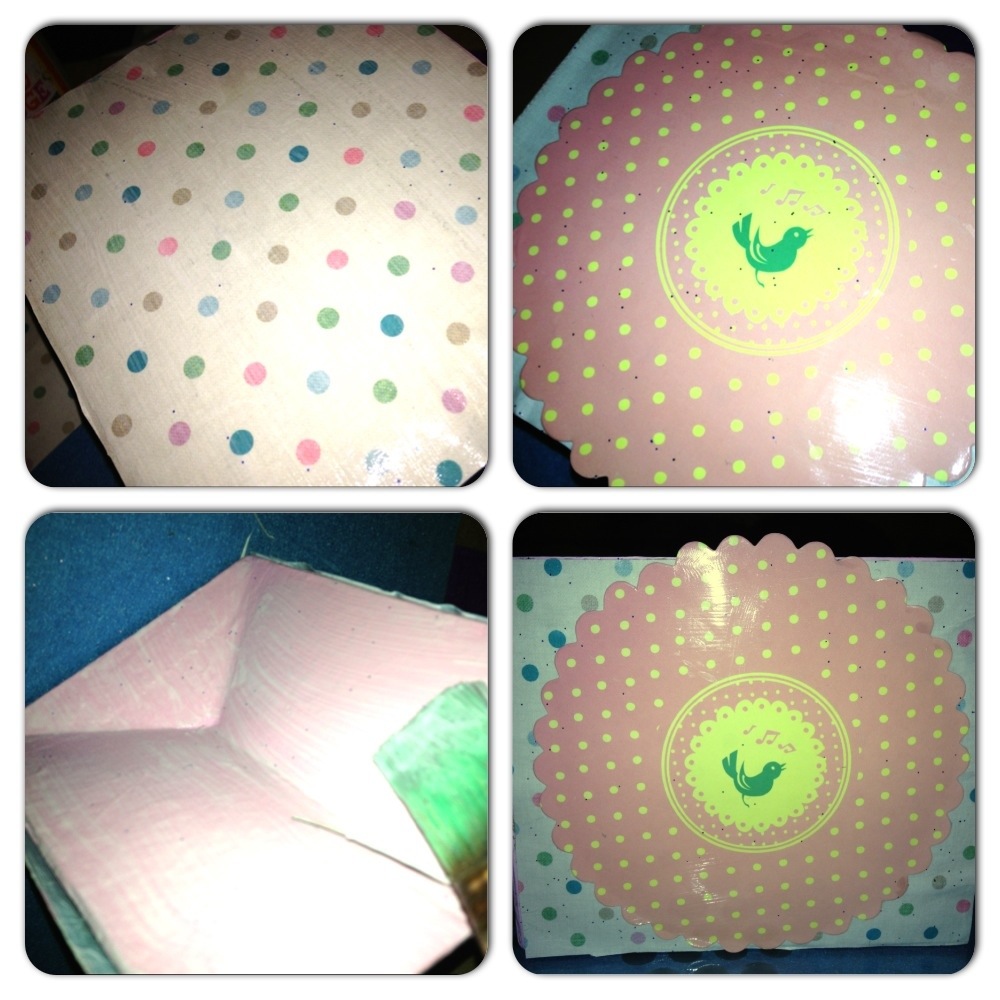
A very cute Box bag decorated with spring and Easter in mind, then filled with cute little treats for my daughter.
To make your own its really very simple, all you’re need is…
1x Paper Mâché box bag (Hobbycraft)
1x Sheet of decorative paper (A4)
White String (Ikea)
1x Birdie tag with button detail (dotcomgiftshop)
2x Cute paper jar lid covers that are identical to one another (dotcomgiftshop)
Mod Podge Gloss (Hobbycraft)
Pink Paint (pastel pink is best)
1x Sheet of yellow felt ( Baker Ross ltd)
1x Sheet of yellow tissue paper
A few glue dots
Tools…
Paint and glue brushes
Scissors
Other items include gifts to place in your box bag. I’ve filled mine with little bits like bath lotions and bubbles, mini nail polishes and bangles.
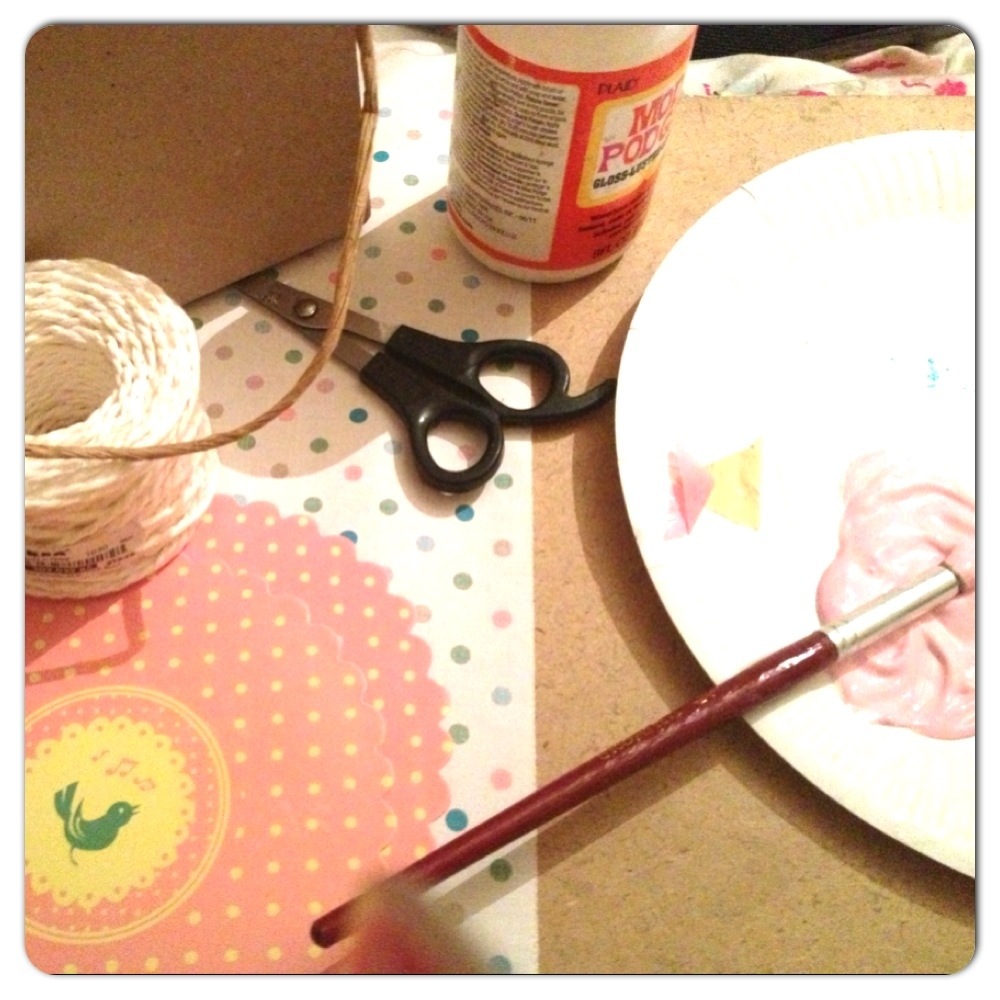
First paint the sides of your box in pink paint. Also paint the edging of the box. Leave to dry and then apply a second coat.
Cut off the boxes paper handles and discard.
Next cut you’re decorative A4 paper in half (I’ve used a nice sheet of pastel Polkadot paper in A4 size). Now line it up to the top edge of the box, roughly trim excess paper but be careful not to trim too short. Once you have applied the paper we can then trim of any remaining excess. To apply the paper, paste on a coat of mod podge gloss and apply the paper to the boxes front. Add a second coat of mod podge over the top and leave for 30 minutes to dry. Don’t worry about applying the paper over the holes that housed the paper handles, this is fine, we will address this later.

Once dry repeat the entire process on the opposite side of your box.
Once you have papered both sides of the box and it is dry, hard and shiny, trim off any excess paper to make your box tidy.
Now take one off the jam jar covers. You should have two identical paper covers, one for either side of your box (mine has this cute birdie in the centre and came in an assortment of jar preserving labels from dotcomgiftshop). In the same way you applied your paper to your box (glue both on the surface and over the top off the paper) repeat for both sides and leave for half an hour to dry.
Once this has completely dried use the point of a thin paint brush to push through the paper and expose the holes for the handles. As the inner section of the box has not yet been covered these are easily located. Do this for all four of your holes.
Now cut some yellow felt and lay it at the bottom of the box. Repeat for the two larger inner sides only this time secure with a few glue dots on each.
At this stage don’t worry about the remaining two sides (smaller inner sides)
Now take a sharp pointed craft tool, the point of a sharp pair of scissors or even a sharp pencil to push through the exposed holes penetrating the felt lining on the inner section of the box.
Now you will need to cut 2 white pieces of string (mine is from Ikea). Cut these to a size that suits. I’ve opted for short handles. Simply thread the string through the holes so one piece goes from one side of the box to the other (as the original handles were before removing). Do this for both pieces only on one piece, tread through one hole and before treading through the opposite side, tread on your little cute birdie tag so the decorative side is seen when it lays flat against your box. Tie all the ends of the string so the handles are secure. Make sure the string attached to your little birdie tag is on the piece of string you’ve tied off to ensure it doesn’t move around the handle freely.

Lastly cut your yellow tissue paper and use to bulk out the inner sections of the box while also covering the remaining sides. This will also keep your surprise gifts cushioned and ever so slightly concealed from little wondering eye.
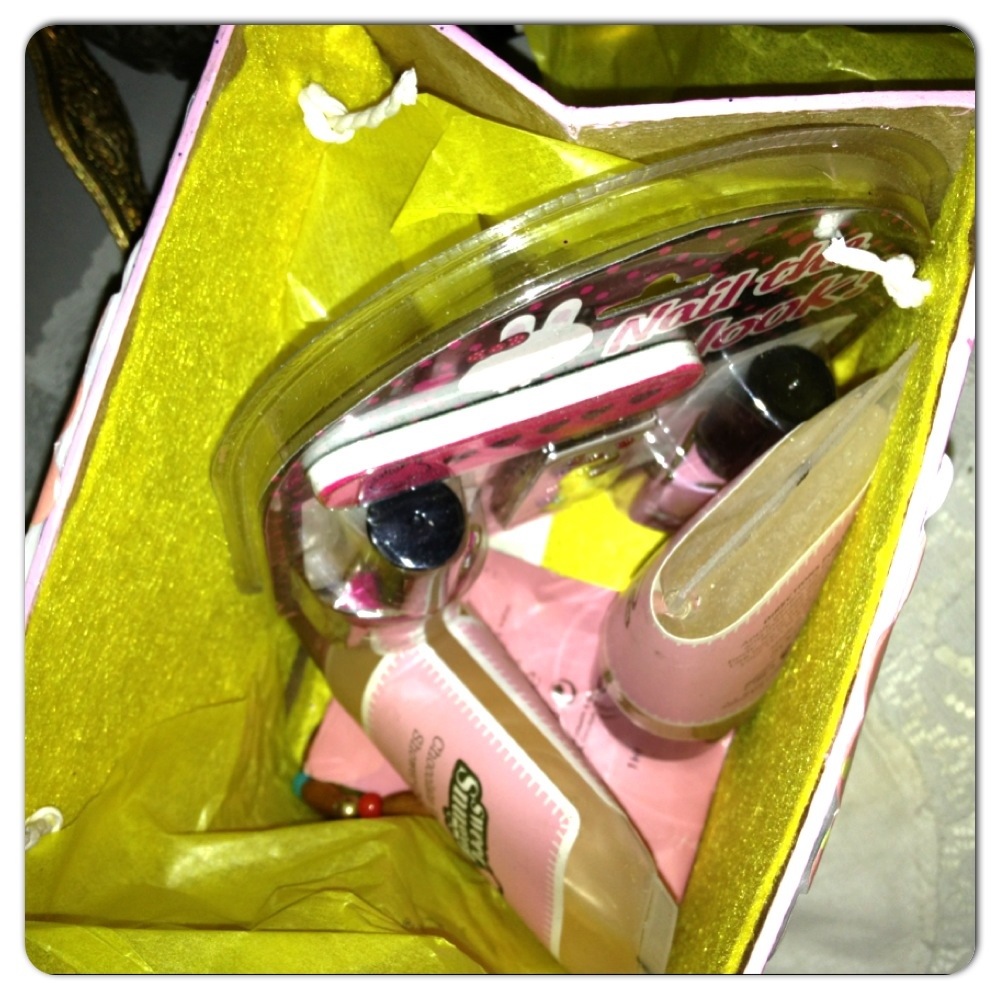
Cute Easter Surprise wouldn’t you agree?

Random musings from a Highland parent doing their best
Little Fingers Big Art
Fashion. Food. Family
Sharing our Family Adventures, Meals and Travels
Kids, craft, crochet, cooking
Theadora's Field Guide to Shopping in Paris
Autism, Autims Awarenes, ASP
Just another WordPress.com site
Life is what you make it
Just another WordPress.com site
Ideas of what a Mum can do with her Family in Cheshire
"Working Together to Help Solve the Puzzle"
The Tales of a Young Family
